Interactive step-by-step tutorial
What are Google Forms header images or banners?
A Google Forms header image, also called a banner, is the image that appears at the top of a Google Form. It’s the first thing your form respondent sees when they open the form, so it’s pretty important. If your Google Forms header image or banner doesn’t match the content of your form or is misaligned with your brand, it can create a confusing or disjointed experience for your audience.
Pro Tip
Consider the Google Forms header image a part of your form content. Select an image that directly relates to the topic of your form.
What is the ideal Google Form header image size?
*According to the Google Support Forum, the recommended dimensions for the Google Form header image is 1600 by 400 pixels at an aspect ratio of 4:1.
Theoretically, you can use any image you like as a header. However, images with other dimensions can result in problems with resolution, making the images look cropped, blurry, or otherwise not ideal. To get the best result, you should use an image with the recommended dimensions. If the image you like is larger than this, you may consider cropping the image to make it fit.
How to upload a header image to Google Forms
Adding a header image to a new, blank Google Form is simple. Here’s how to do it:
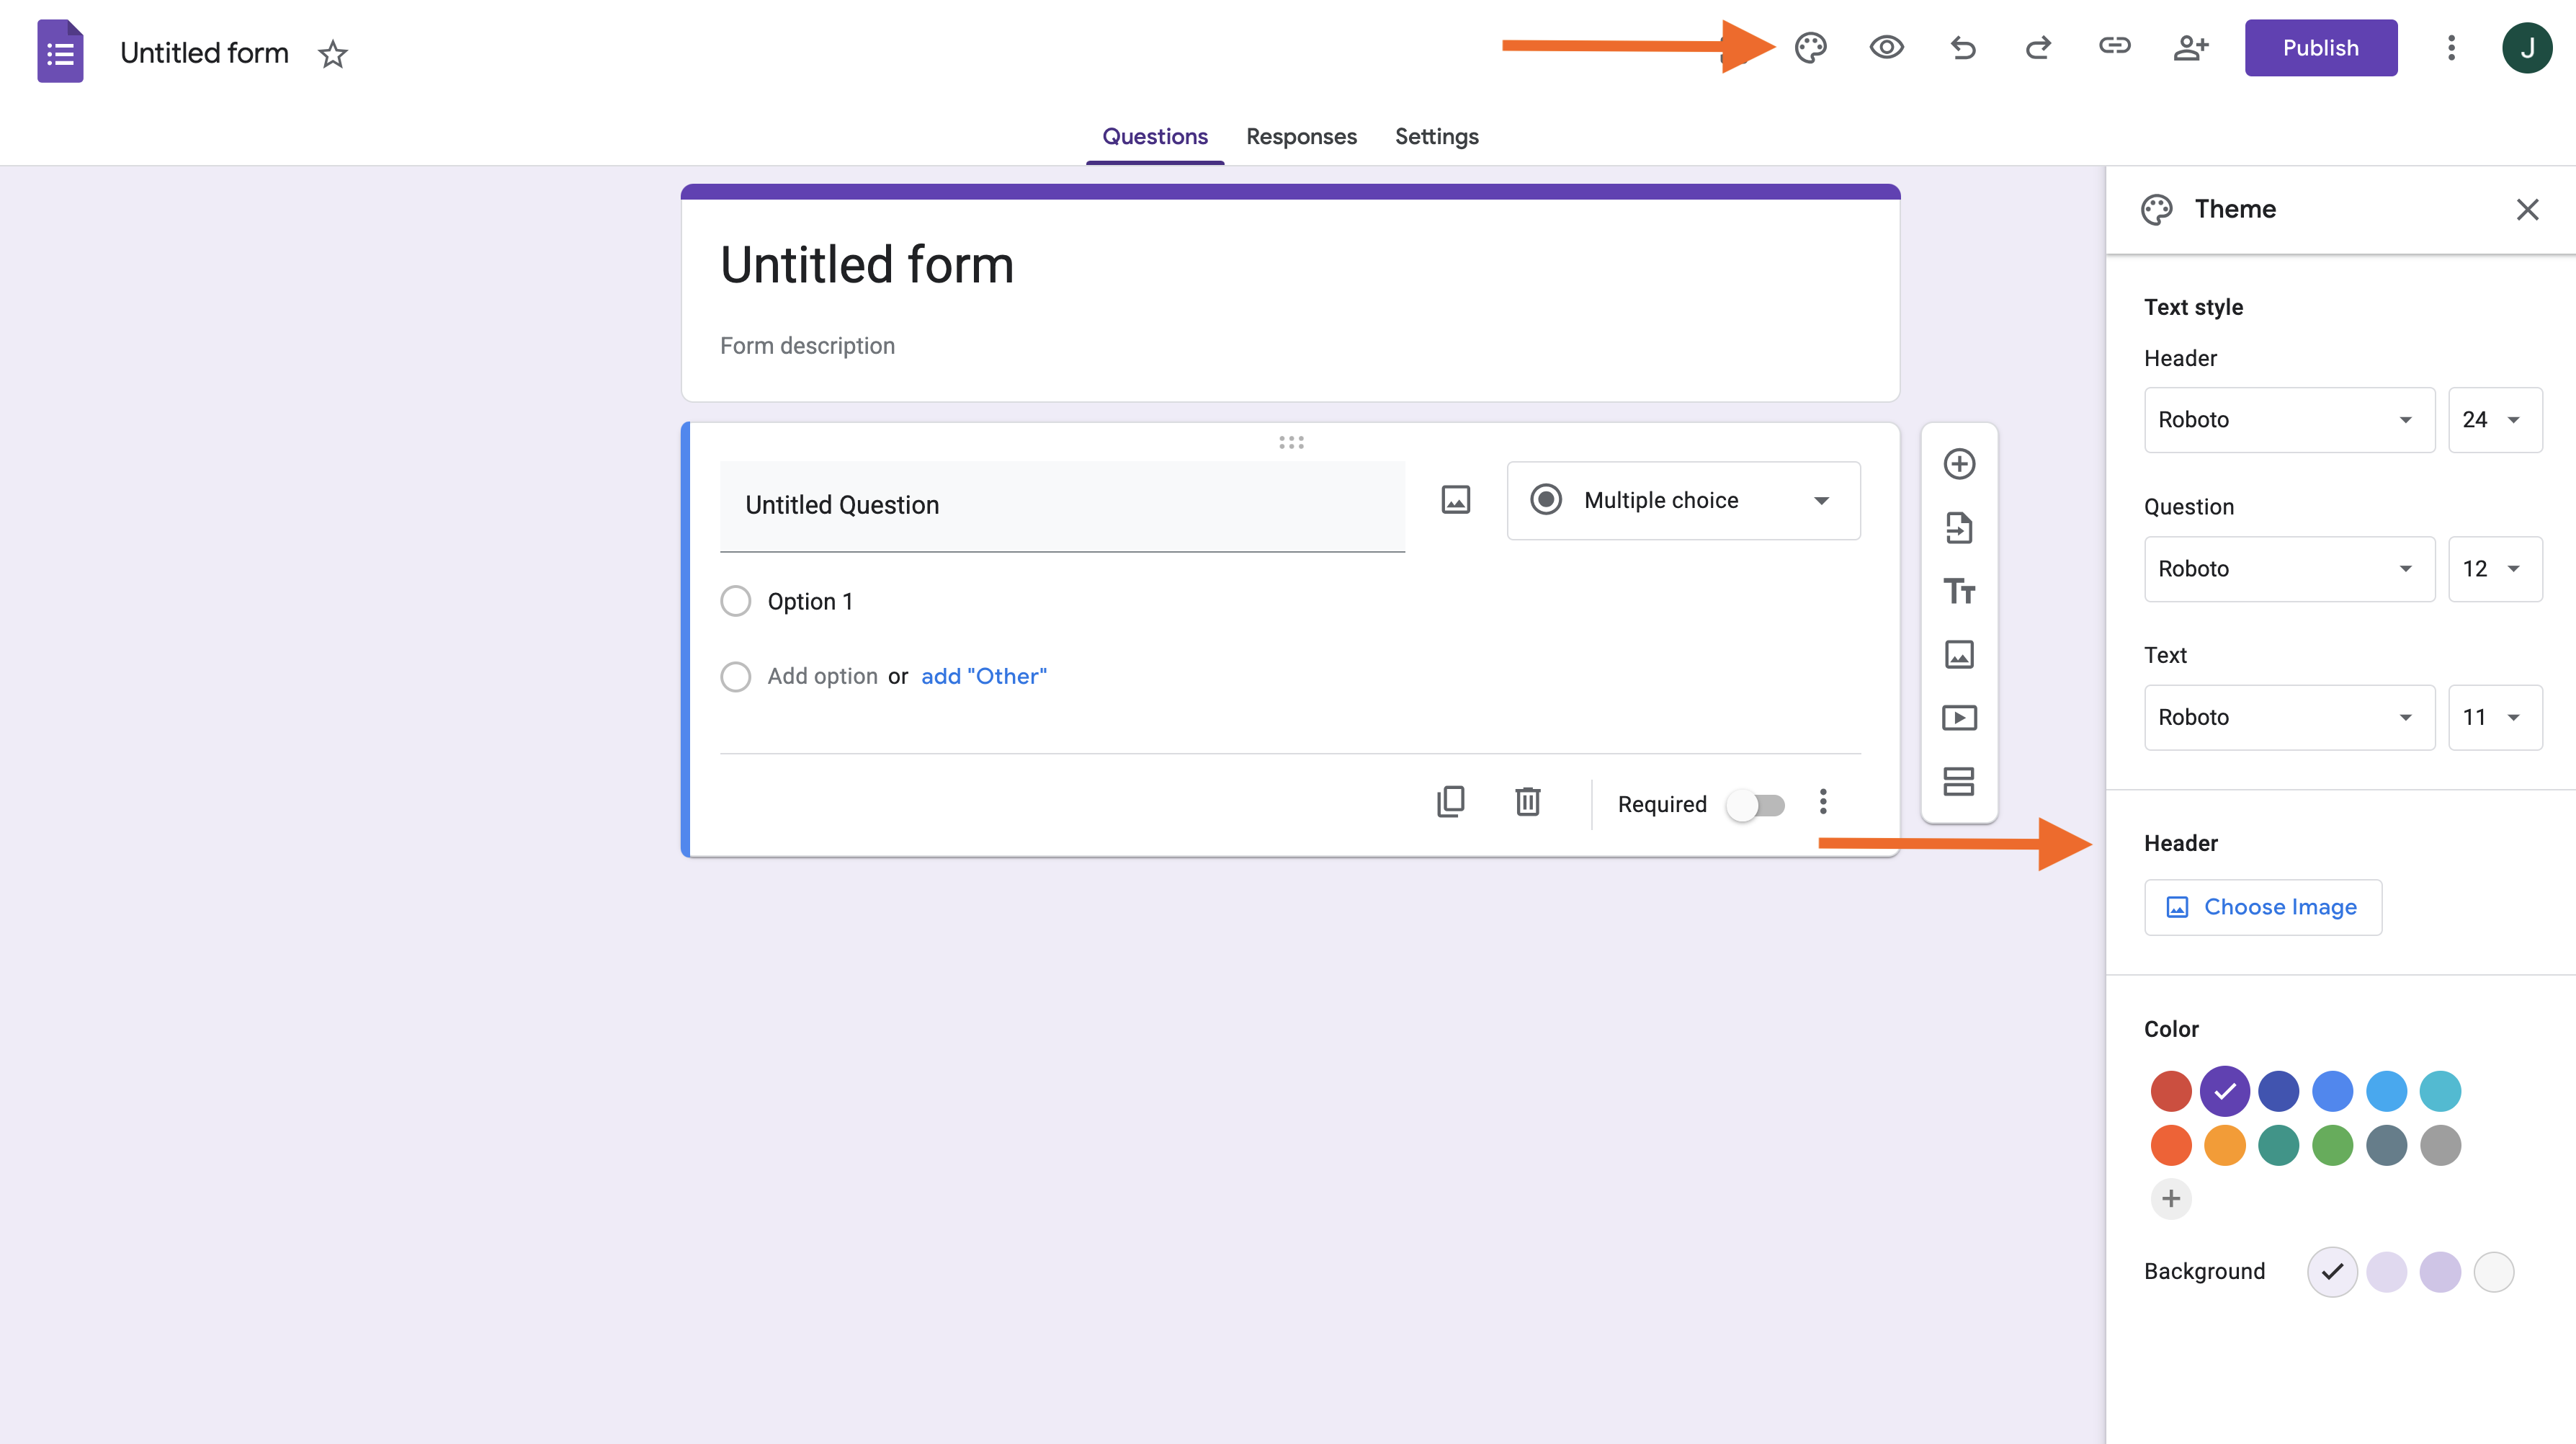
- Open the form you want to add a header image to and click the paint palette icon in the top right to open the Theme menu. The menu will open up on the right side of the screen.
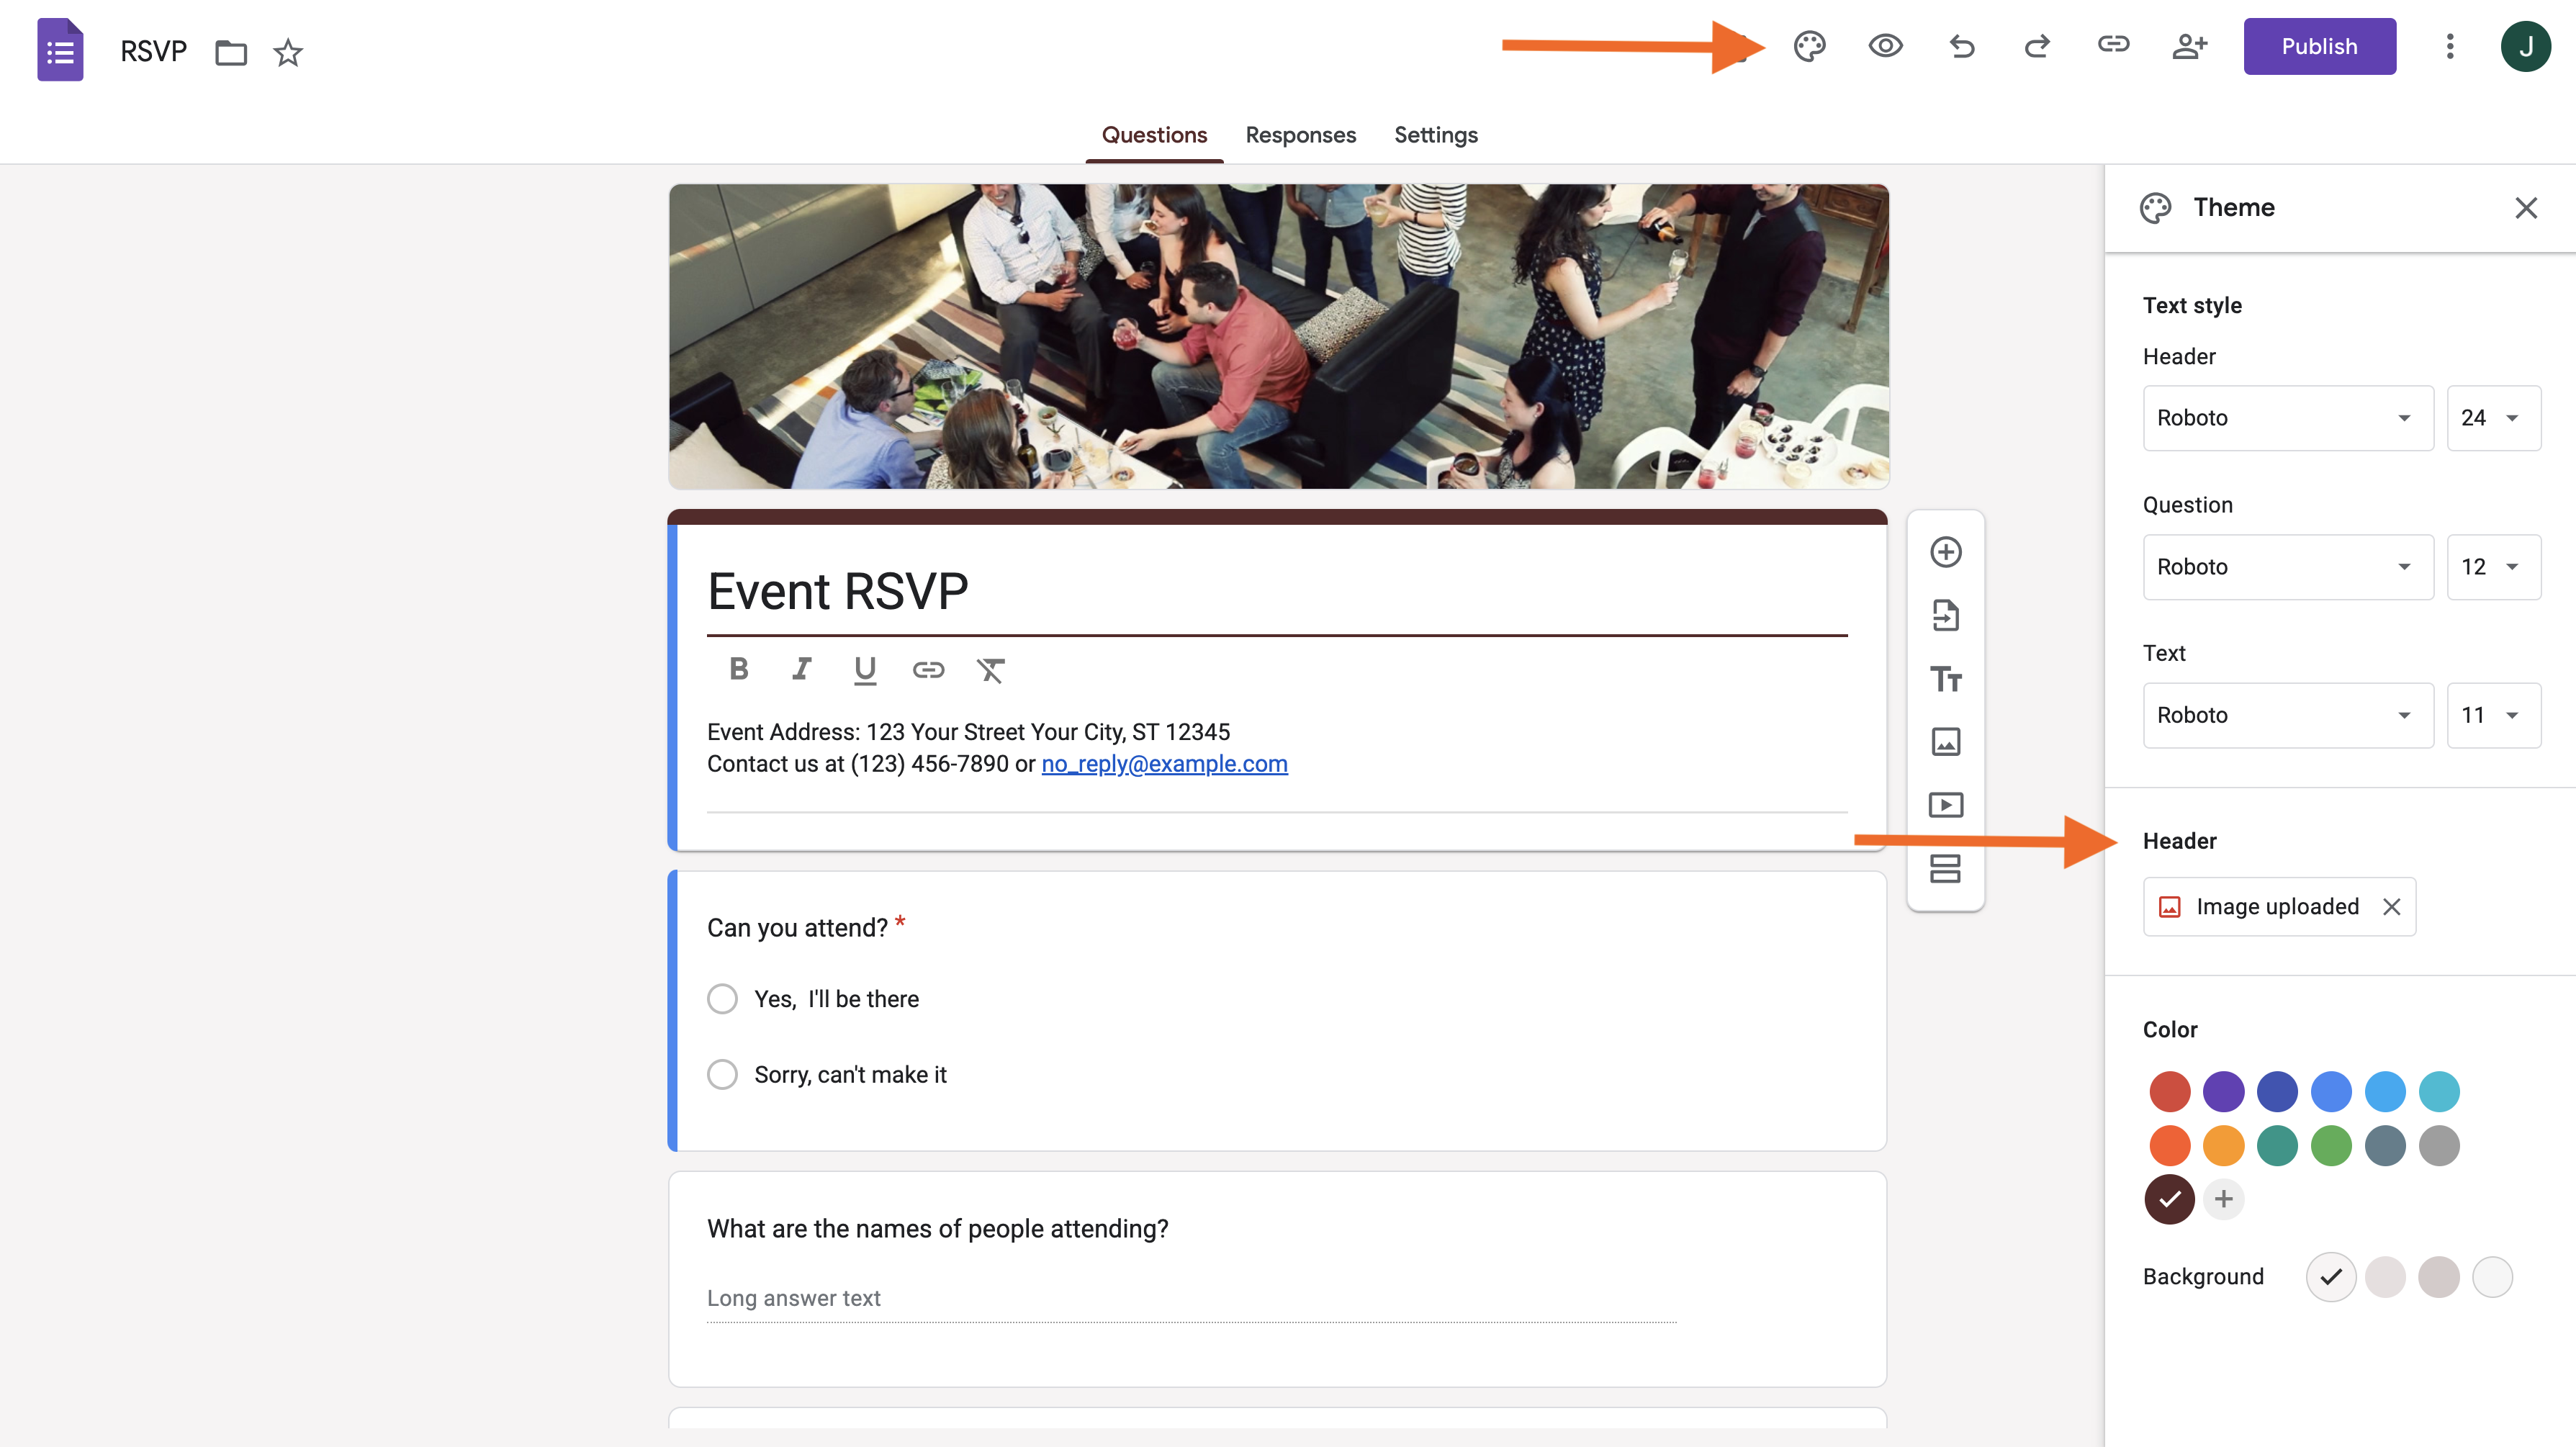
- Under the Header section, click on Choose Image. (If you’re using a template that already has a header image, click on Image uploaded to choose a new file. We’ll cover this option in more detail below.)
- Google Forms will display a popup menu with three options for adding a header image: Themes, Upload, and Photos. Click the Upload tab to use an image from your computer.
- Click Browse to choose an image.
- Use the sizing tool provided to see how much of your image will be visible in the header. Drag the sizing square over your image to select the area you want to display.
- Click Done to upload the image to your form.
Pro Tip
Google will automatically adjust your form’s colors based on the new header image you’ve uploaded. If you don’t like the colors, you can customize them using the Theme menu.
How to customize the header image in Google Forms
You can also change or customize an existing Google Forms header image, such as the header image included in a Google Forms template, by following a similar process to adding a new header image.
Let’s use the RSVP form template in Google Forms as an example.
- From the Google Forms home page, open the RSVP form in the templates in the top row by double clicking it.
- In the template, select the palette icon at the top of the screen, then scroll down to the Header section and click Image uploaded.
- Choose Themes, Upload, or Photos to customize your header image.
- Themes. You can choose from the large selection of stock photos listed in the Themes tab. Images are sorted by category; some even have subtle animations, which can add interest. Be careful not to pick one that’s too busy, though, as it could be distracting.
- Upload. Choose this option to upload a different image from your computer. Follow the same steps from above.
- Photos. This tab works just like the Upload tab except that you can choose images from your Google Photos.
How to resize an image for a Google Forms header
If you decide to use your own image, you’ll have the option to adjust the image to match the requirements in Google Forms.
The options to edit your image include selecting an area to crop and rotating the image. If you want to do anything more than that, you’ll need to use a photo editor.
Google Forms doesn’t offer a lot of customization options. You can’t change the size and layout of form elements or other components — including headers. So, while you can resize the cropping boundary of your image, you’ll always be locked into the same 4:1 aspect ratio.
You can either crop an existing image to that aspect ratio or create an image from scratch that fits the ratio. Again, an image that’s 1600 pixels wide by 400 pixels high is ideal.
How your form’s header image impacts your brand
Your brand is more than a collection of colors and images. It presents a story about your business to customers. The colors, images, and other visual brand elements you use remind people of that story. For example, this image from Google’s template gallery uses bold and bright colors and striking imagery. It would work well for a brand that aligns with that type of design.
The header image on an online form is the first thing a user sees. A strong, visually appealing header image can create a positive first impression that helps remind people of your brand’s identity. On the other hand, a poorly designed header image can detract from the user experience and damage your brand’s reputation. While this image below is part of Google’s template gallery, it’s not particularly interesting or eye-catching, and it may even detract from your overall brand appeal due to its lackluster appearance.
Here are a few ways in which the header image on a form can impact your brand:
- Visual appeal: A well-designed header image can make the form more visually appealing and engaging, which can help draw users in and encourage them to complete the form.
- Brand identity: The header image is an opportunity to showcase your brand’s style and personality. By choosing an image that reflects your brand’s values and aesthetic, you can foster a stronger connection with users and reinforce your brand’s identity.
- Professionalism: A poorly designed header image can make your form look unprofessional, which can undermine the credibility of your brand.
Overall, it’s important to choose a header image that’s visually appealing, on-brand, and professional in order to create a positive user experience and effectively represent your brand. Here are a few visually appealing Google Forms header images from Google’s template gallery:
How to get more header image options with Jotform
Google Forms was originally designed as an add-on to Google Sheets, so it was never meant to be a fully featured, standalone form tool. It can do a lot, but when you start getting serious about features and design, you’ll want to switch to a more advanced tool — like Jotform.
One of the most appealing things about Google Forms is that it’s free. Fortunately, Jotform also offers a free plan that gives you access to all of Jotform’s features. You’ll only need to switch to a higher, paid tier if you find yourself using it extensively and need more forms or form submissions.
Adding header images in Jotform is simple. Whatever scale your header image is, that’s what you’ll see in your form. You can also choose how you want to size it. And you can even align it to the left, right, or center. Jotform’s advanced form designer will even let you change the CSS for your form.
Jotform is also one of the most feature-rich form tools on the market. It offers a ton of form elements, templates, and integrations. It also offers advanced business tools for data management, approval flows, and even app creation.
Let’s take a closer look at how to use it.

Looking for the best alternative to Google Forms?
Jotform’s full-featured form-building solution is mobile-friendly and has the most integrations in the industry. Use it to collect payments, automate workflows, gather leads, and more.
How to customize your header in Jotform
To get started in Jotform, sign up for a free account. Just like in Google Forms, you can get started easily with an RSVP template in Jotform.
The biggest difference between the templates you get with Jotform and those in Google Forms is just how many there are. Google Forms has less than 20 form templates, while Jotform offers more than 10,000.
Try our RSVP Template now 👇
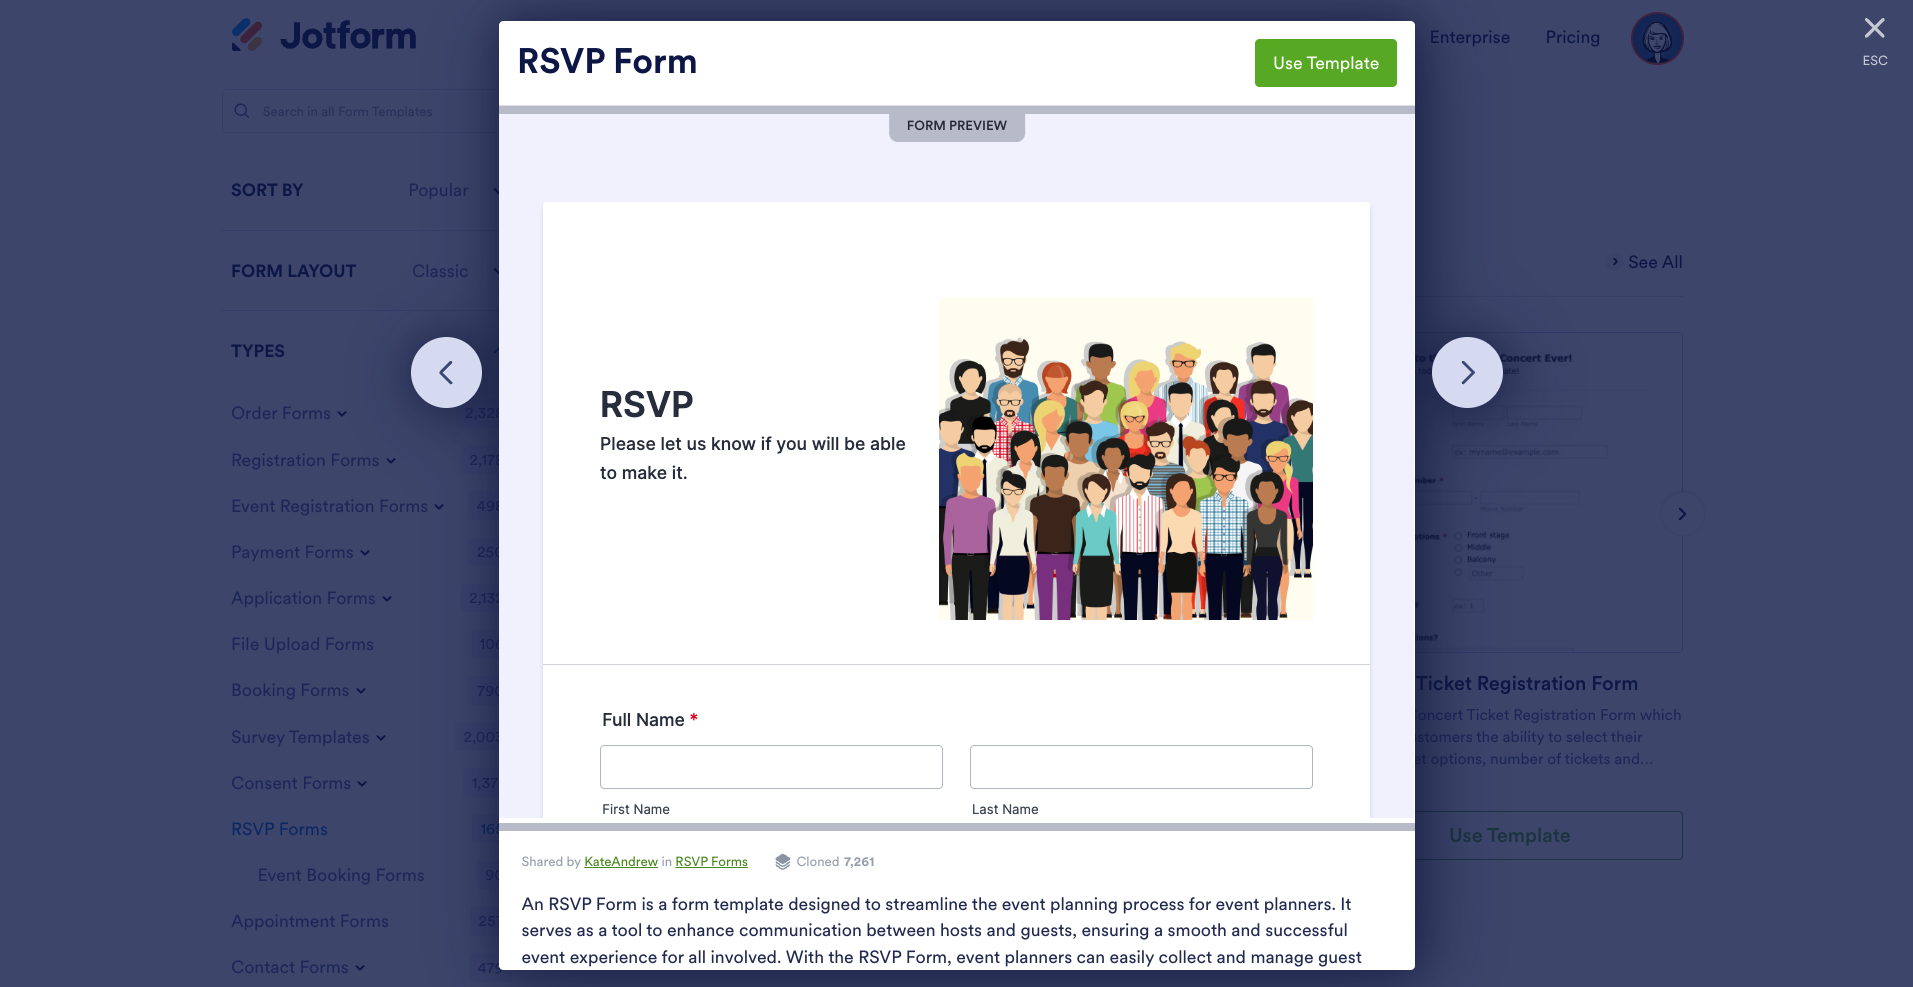
To make getting started easier, let’s use a simple Jotform RSVP template.
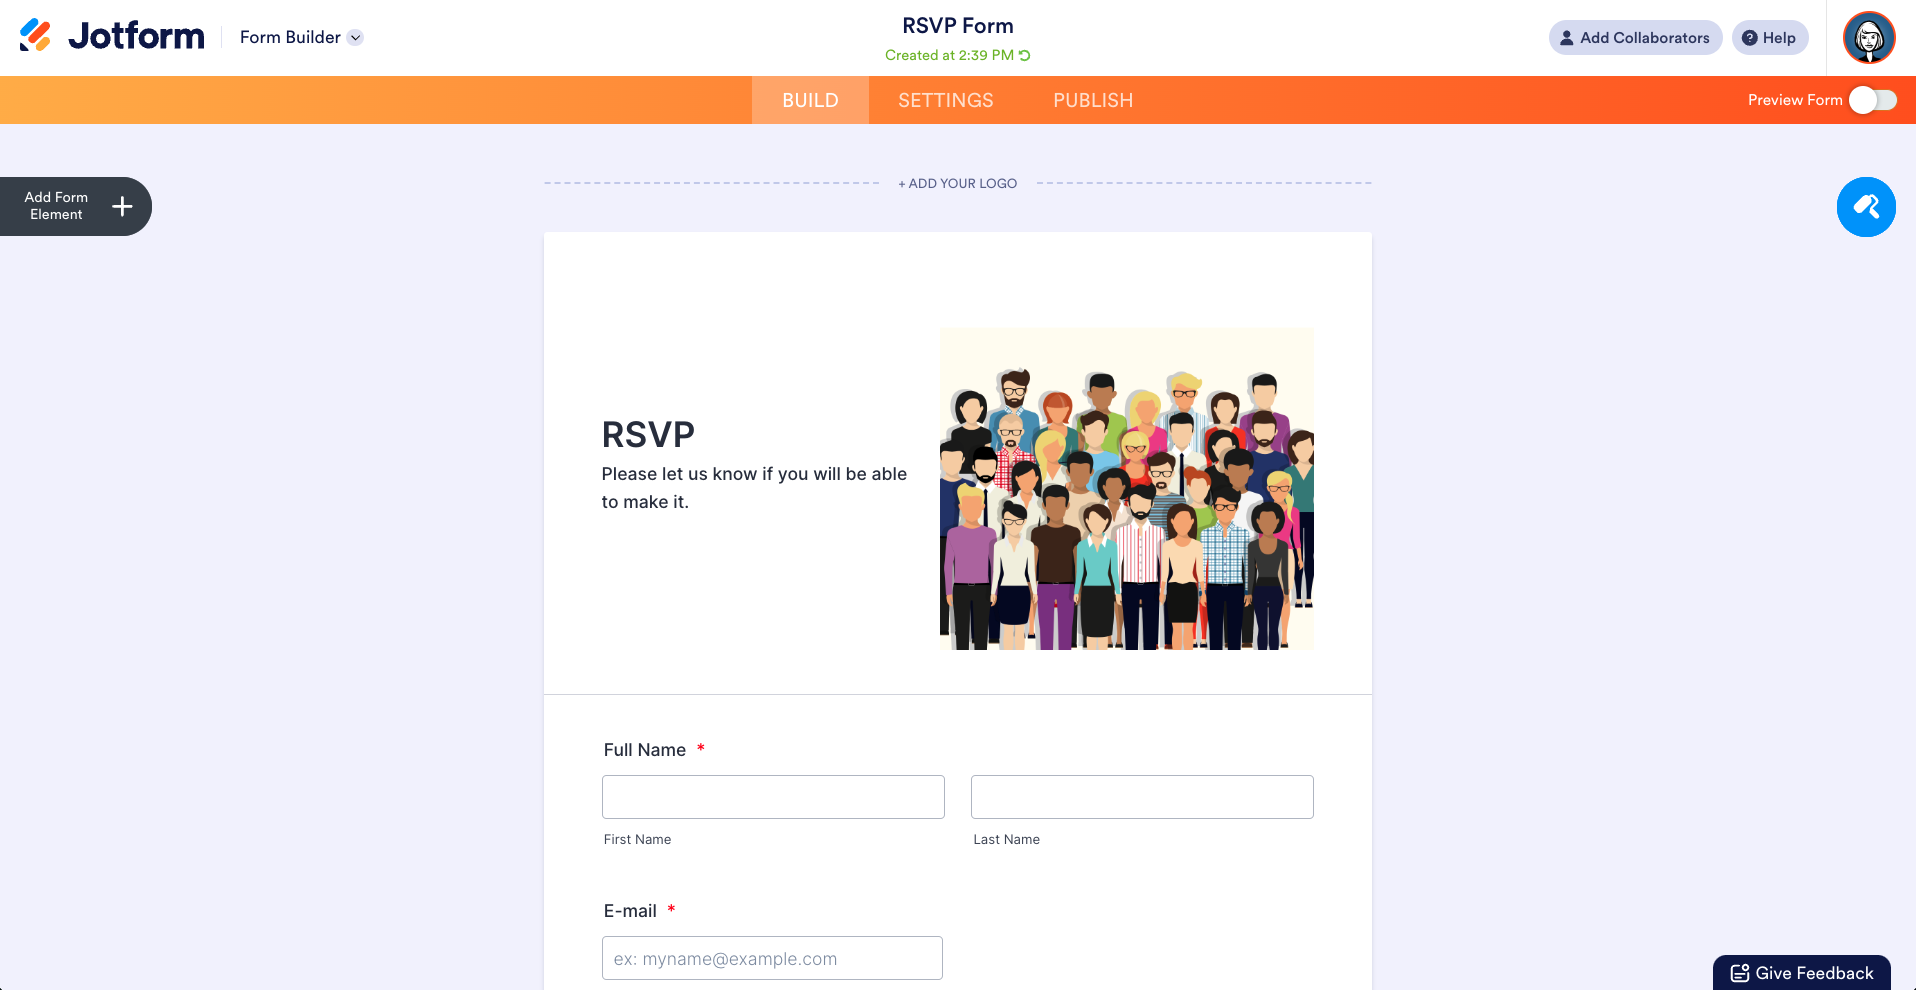
If the template preview looks good, click Use Template. That will take you to the Form Builder.
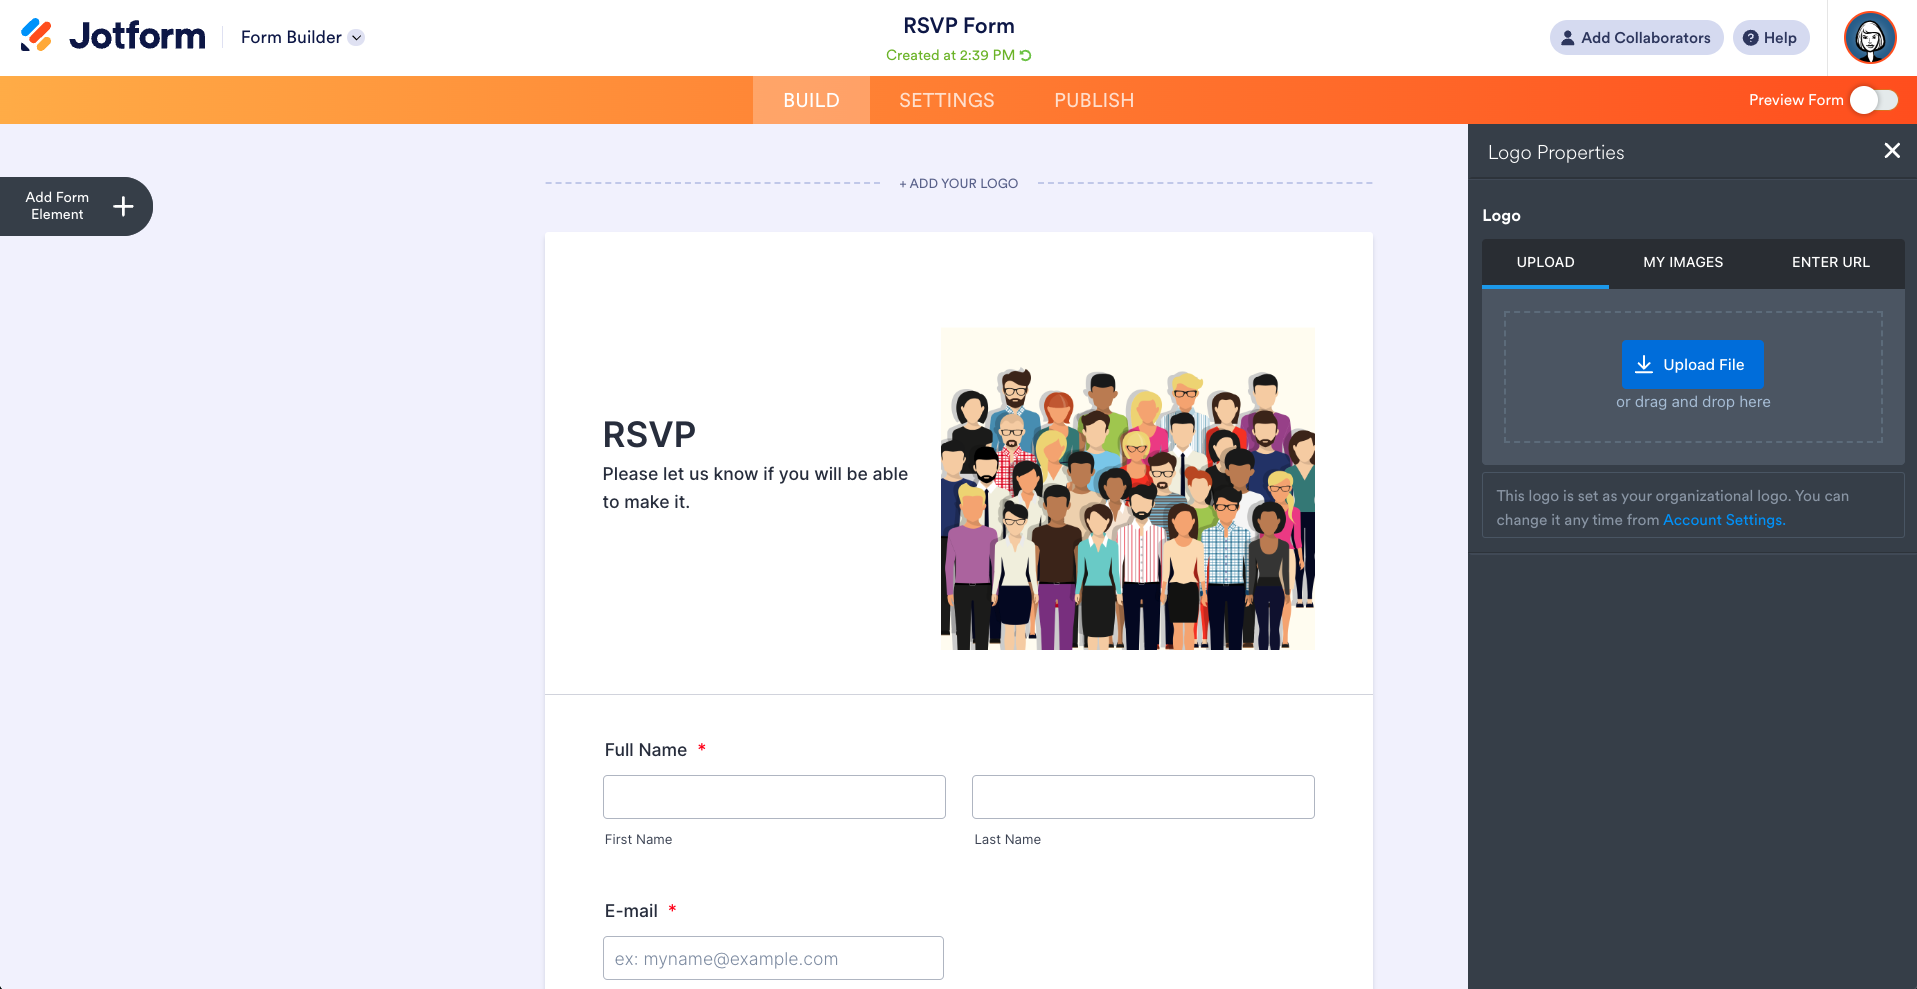
To add a header image, click + ADD YOUR LOGO at the top of your form. You’ll then see the Logo Properties menu.
The Logo Properties menu gives you three options that are similar to the image options in Google Forms. You can
- Upload an image from your computer
- Choose an image you’ve previously uploaded to Jotform
- Add an image from anywhere on the web by pasting the URL for it
You can use the Logo Size slider to change the image size, and you can align it to the left, right, or center. If you want to edit your image further, you can do that better with an outside photo-editing tool.
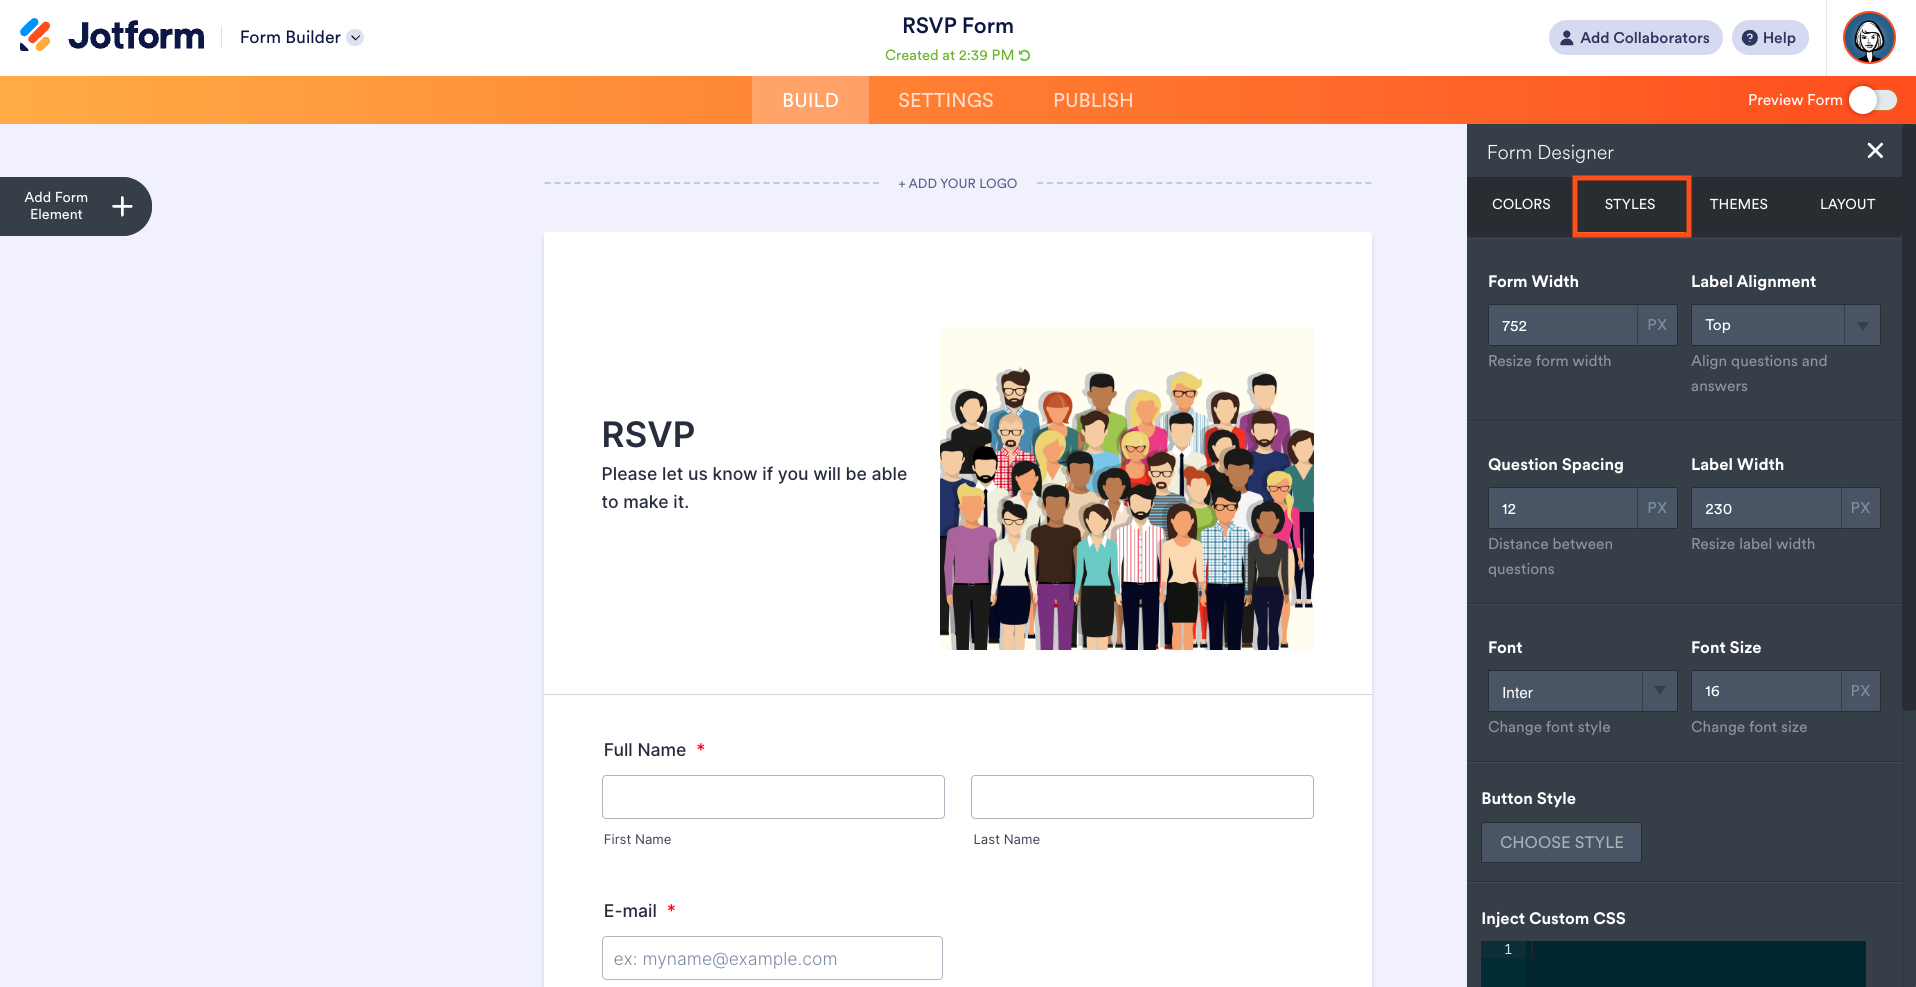
With that said, you can do more with Jotform if you don’t mind rolling up your sleeves. Let’s start by opening up the Form Designer by clicking the blue paint roller icon on the right. Then select the Styles tab.
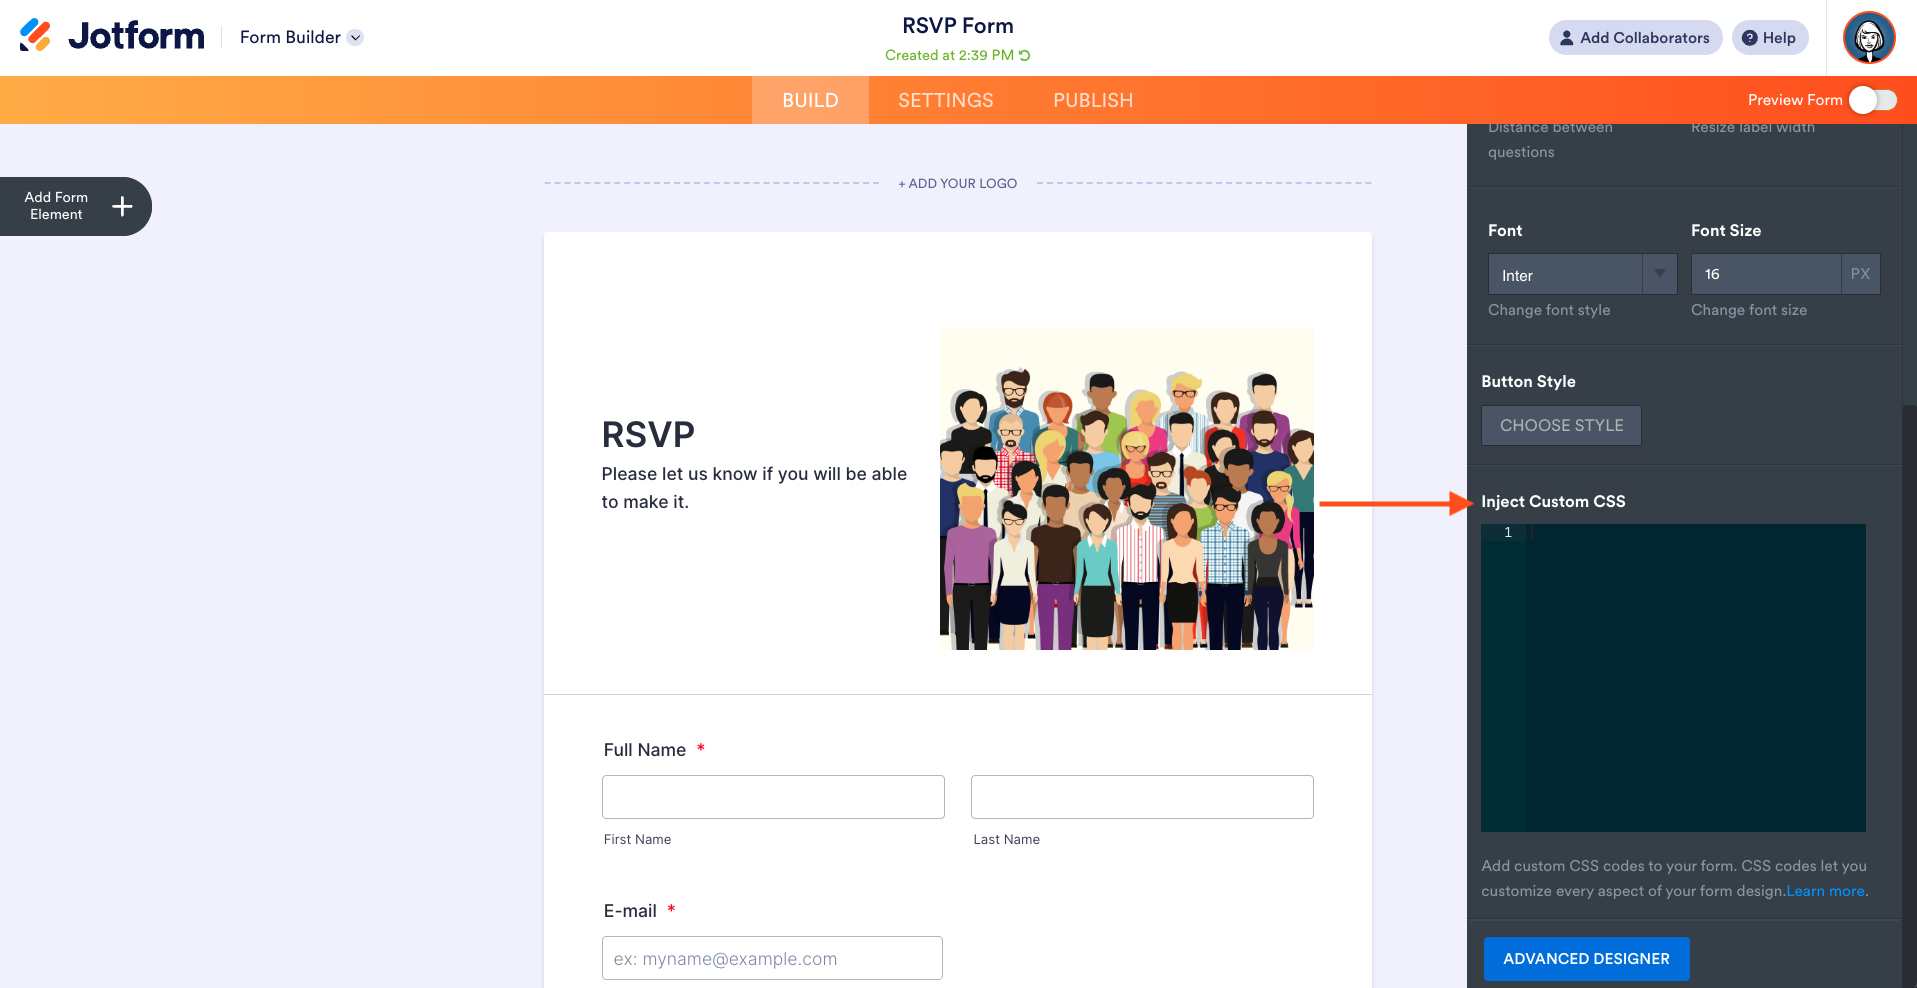
This tab gives you the most in-depth options available for customizing your form without getting too involved. And if you scroll to the bottom, you’ll see two more options to really supercharge your form.
As you can see, you can inject Custom CSS into your form, which should make your web designer friends happy. Click the Learn more link to see which elements you can alter here. You can go even deeper into CSS design options with the Advanced Designer.
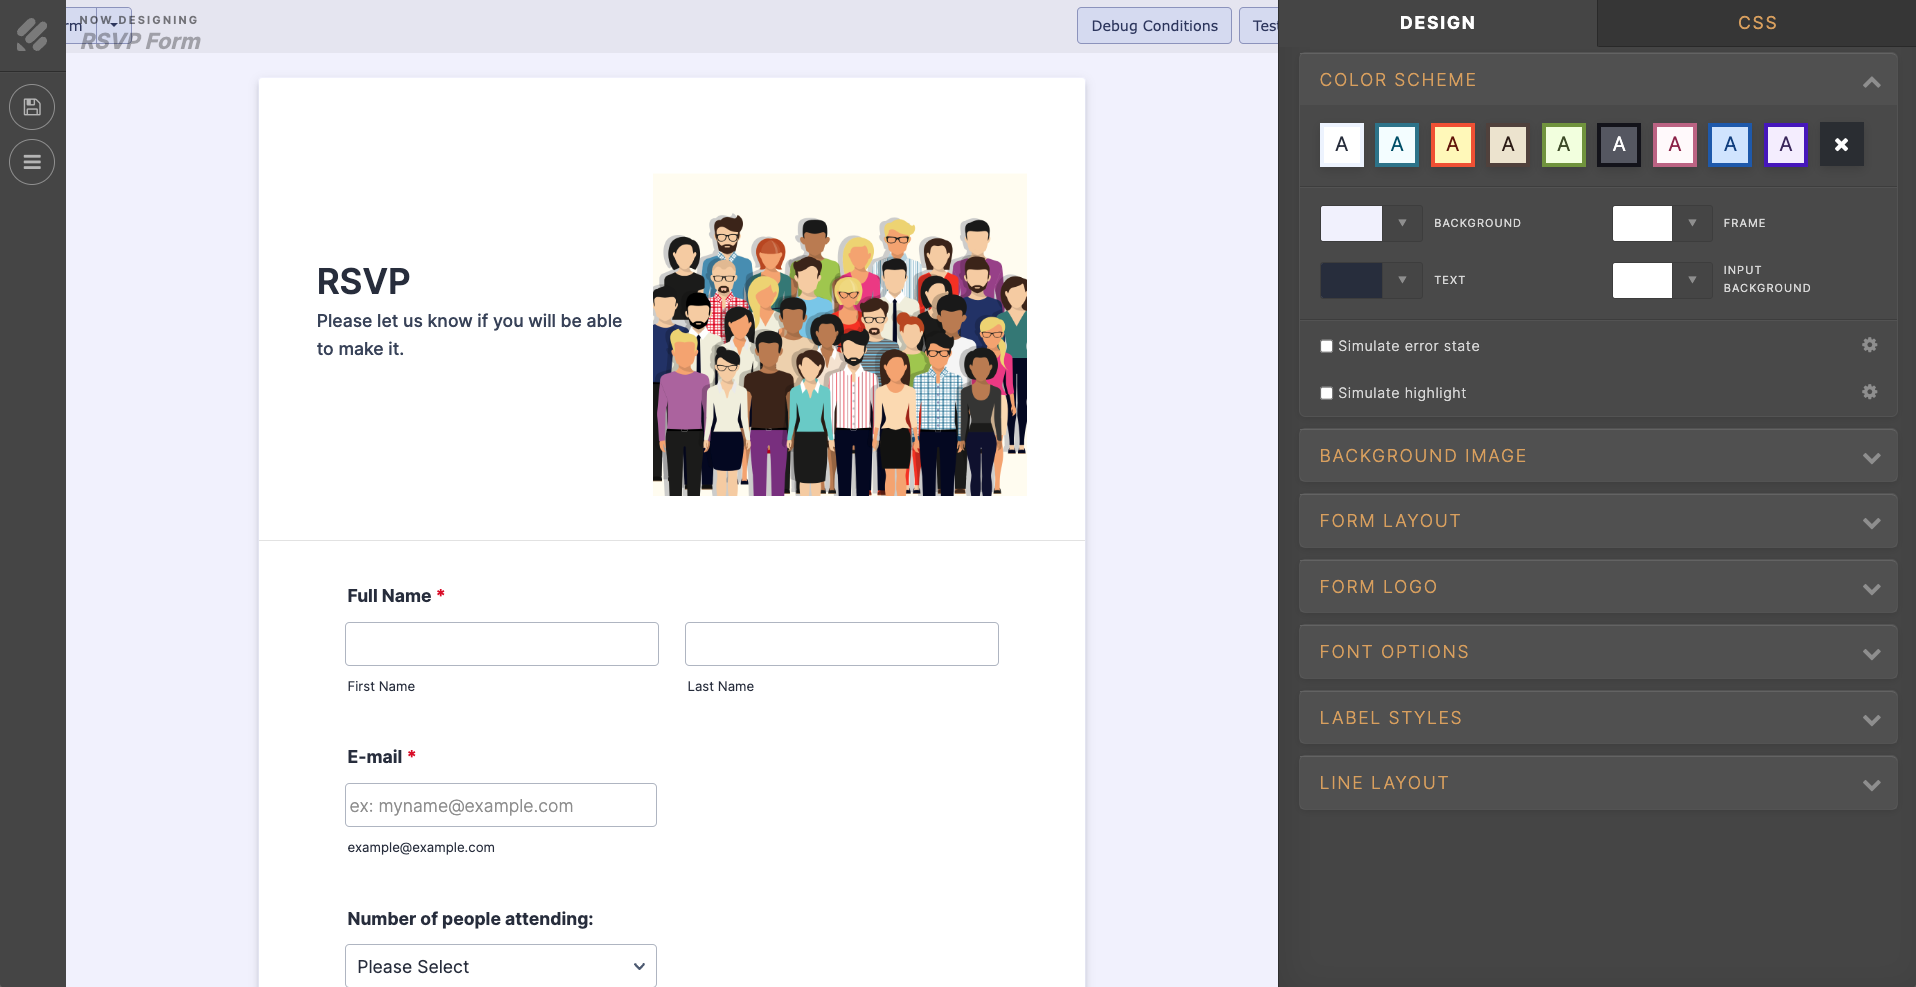
At the bottom, there’s a large button that will take you to the Advanced Designer tool. If you click that, you’ll go down a rabbit hole of customization options.
From the Advanced Designer, clicking on the Form Cover section gives you a similar set of options for editing the header image as you get with the standard designer, but you have much finer control over those options here.
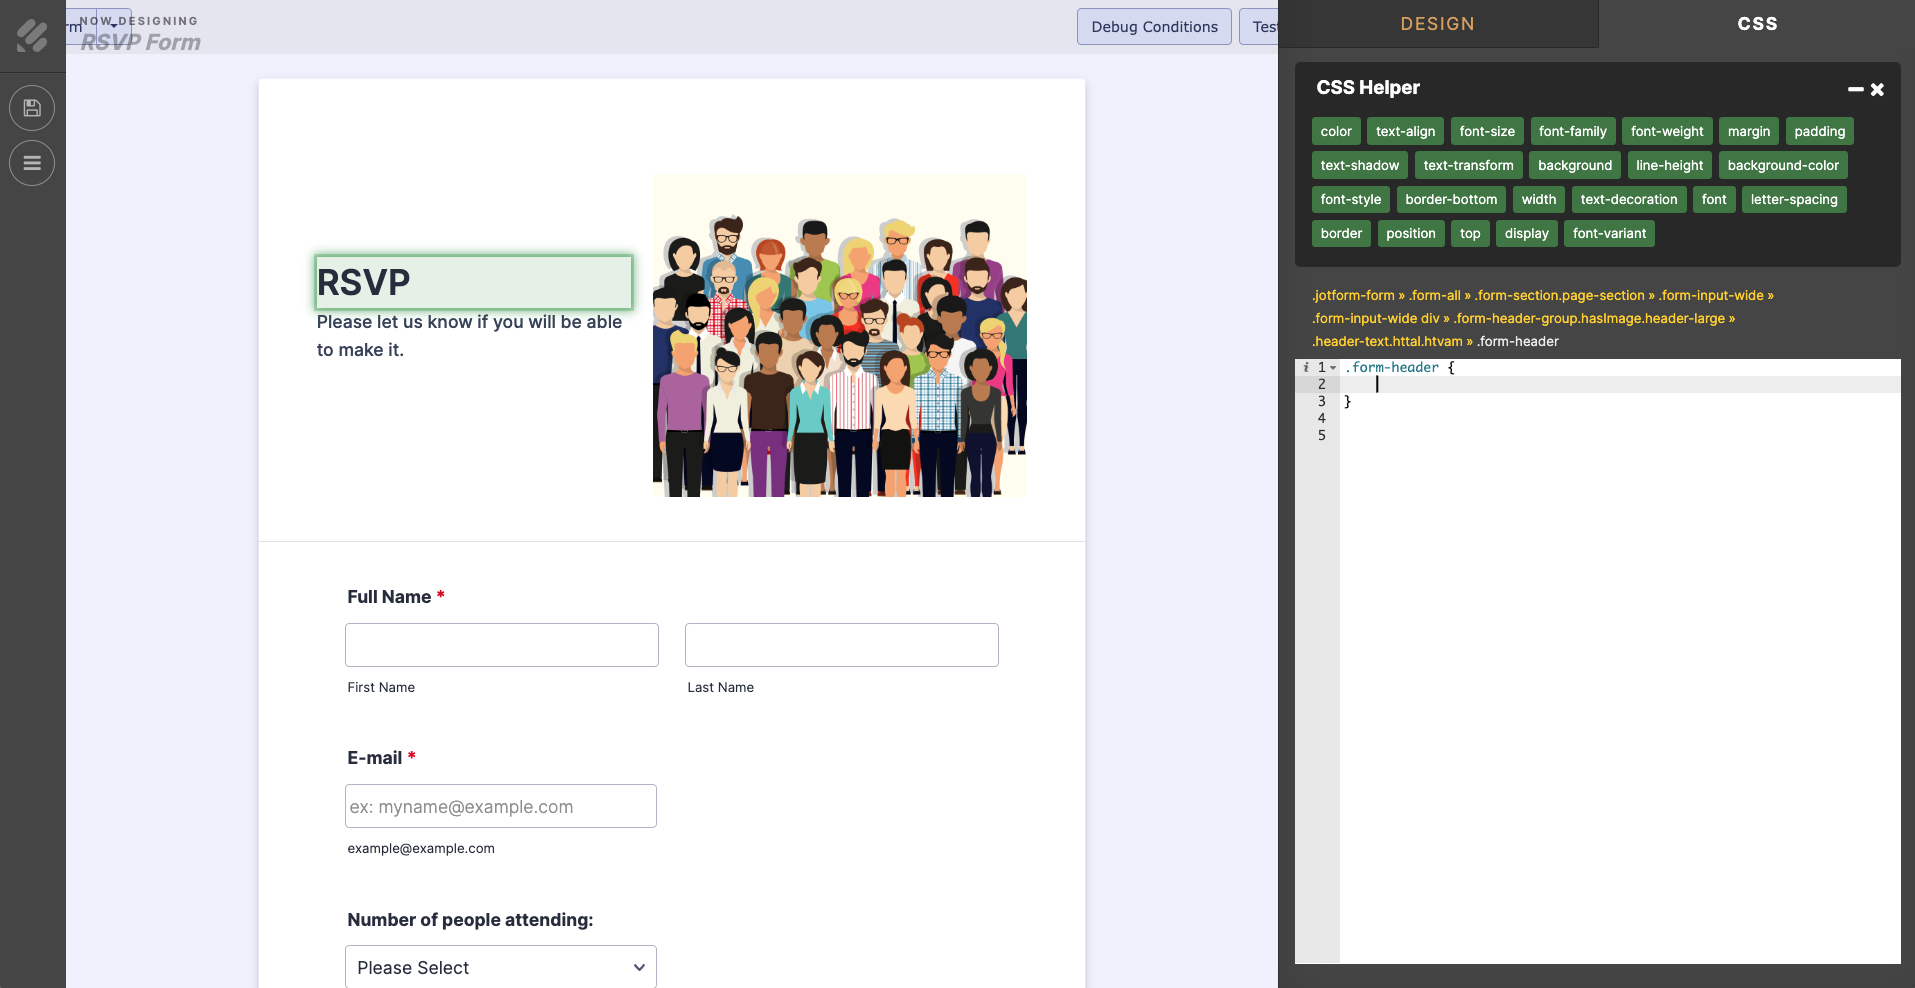
And if you click on the CSS tab, you’ll see a more advanced editor than the simple CSS field you got in the standard designer.
Not only do you have easy access to the proper elements of your form, but you also have buttons to quickly add some of the most common CSS options to your HTML element.
How to customize more than headers
By only looking at the header image, we’ve barely scratched the surface of Jotform’s customization options.
If you’re not technically inclined, then Jotform’s basic options alone will take you much further than other form editors on the market. And if you’re a professional designer — or you work with someone who is — then you’ll appreciate the immense flexibility you’ll get with Jotform.
Sign up for Jotform today to try it out yourself.

































































Send Comment: