Bet you don’t know many of the features listed below! If you do know most of these then you must be a Jotform pro! For the rest of us, let’s take a look at them in our path to Jotform nirvana.
1) Option Groups in Drop-Downs
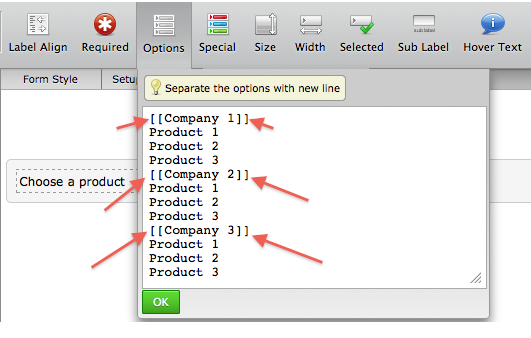
This is truly a hidden feature! It makes your dropdown questions more organized and easy to use. Here is an example of what it looks like:
1. Create a drop-down menu,
2. Select the options tab and add some options,
3. Put double brackets at the [[ beginning and end ]] of your option groups.
2) Amazing Ways to Customize Questions Appearances
These options are for people who are obsessed with keeping things in line. Use them to make your forms neater. Try the options as we go through them. Maybe it is a small detail but you might want to give some designer’s touch to our forms, right?
Manage Distance Between Questions:
1. Go to “Setup & Embed” tab and select “Preferences”
2. Select “Field Styles” tab and then change the “Question Spacing” option to desired amount. “0” is the closest distance.
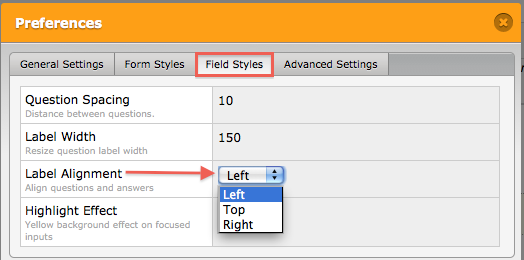
Adjust Label Alignment of Questions:
1. Go to “Setup & Embed” tab and select “Preferences”,
2. Select “Field Styles” tab and then change the “Label Alignment” option to desired alignment.
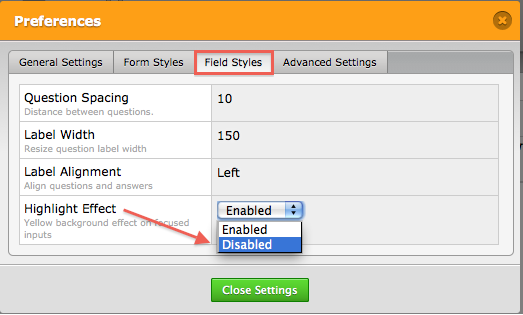
Disable Highlight Color:
1. Go to “Setup & Embed” tab and select “Preferences”,
2. Select “Field Styles” tab and then change the “Highlight Effect” option to “Disabled”.
3) Use Form Collapse Like a Pro
Form collapse may look confusing at the first look. Understanding the basics of how it works can create miracles on your forms. Now, let’s start form collapsing:
1. Add a Heading from Form Tools,
2. Add a Radio Button from Form Tools,
3. Select Survey Tools and Select Form Collapse,
4. Under the Form Collapse button place other buttons and tools etc.
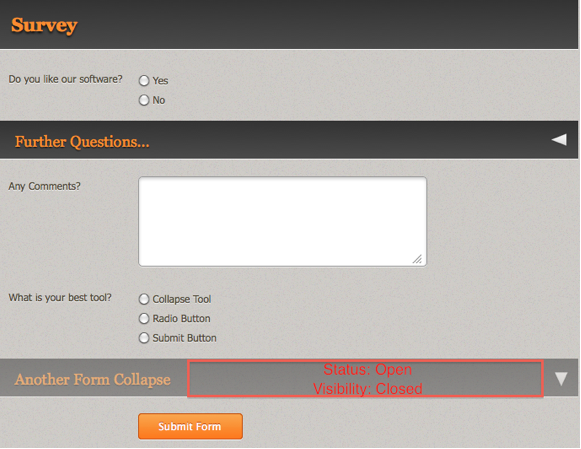
5. When you click on the Form Collapse button there are 2 options on the toolbar at the top. Status determines the Form Collapse button behaviour.
a. When “closed“, viewers will have to open it manually.
b. When “open“, viewers will see it open by default.
6. “Visibility” determines the “Form Collapse” button visibility to the viewers.
a. When visible, the viewers can see the Form Collapse button.
b. When hidden, the viewers cannot see the Form Collapse button.
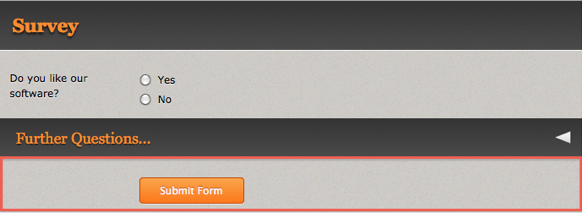
7. Then we click on Form Collapse to open it:
Here are some questions you might have with using Form Collapse in this example:
1. What if viewers don’t open the form collapse and submit the form?
2. How do we stop the form collapse button to show other stuff underneath it independently?
Let’s follow the same example and add another Form Collapse to answer both of the questions.
- Add Form Collapse on top of the Submit Form button.
- Set Status to Open
- Set Visibility to Hidden
Here is what it looks like finally:
More Tips:
The placement of “Form Collapse” button may be confusing but know that the “Form Collapse” button could either hide or show all the data below it.
A “Form Collapse” button can be used as a way to stop the form from being submitted.
4) Spice Up Your Form Design With CSS Injects
CSS Inject allows you to customize anything visual on the form from the CSS. It requires some CSS knowledge. Let’s see an example: Change background color on a form.
You can find a RGB color generator here for choosing a nice color:
Here is what our form looks like before applying CSS injects:
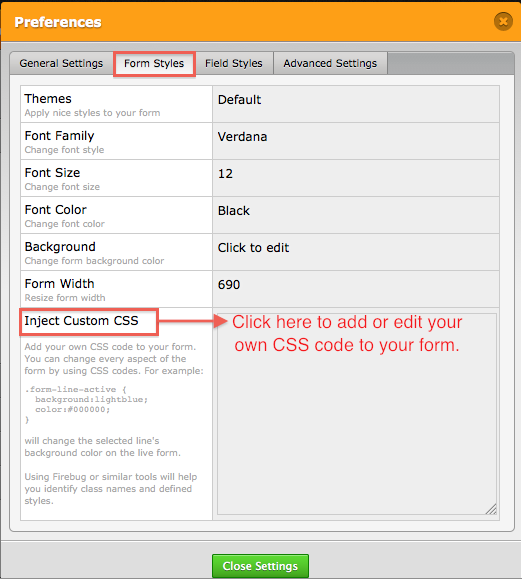
To enter any CSS rule you have to get into the Inject Custom CSS section on the Form Styles tab. To do that, first go to Setup & Embed tab and then click Preferences.
Now go to “Form Styles” and go to “Inject Custom CSS” and click to add your own CSS code.
Here are some of the CSS codes you can experiment with:
Change the header background color:
.form-header-group{
background-color:#3366FF;
}
Change the sub header background color:
.form-subHeader{
color:#FF9933;
}
Change the First Name and Last Name label styles:
.form-sub-label{
color:#990000;
}
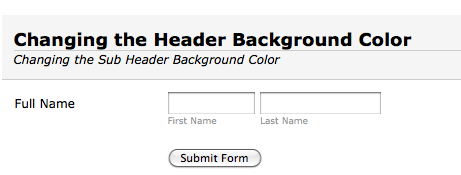
After making these changes here are what our form looks like:
5) Change the Validation Messages
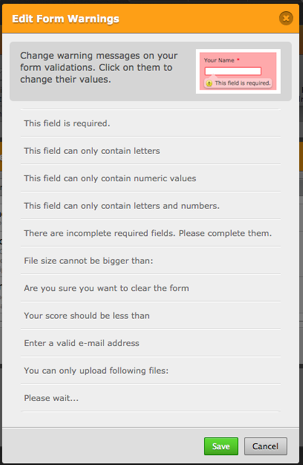
Did you ever want to change one of the validation messages such as “this field is required”? It is perfectly possible. Check it out!
1. Go to Setup & Embed tab and select Preferences:
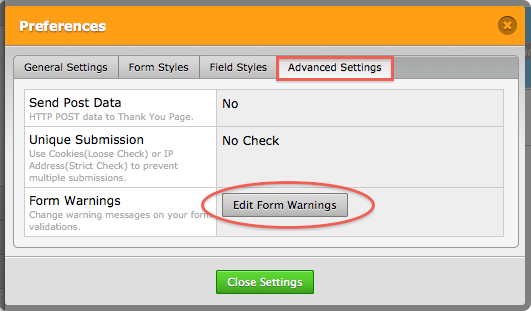
2. Go to Advanced Settings and click Edit Form Warnings:
3. Click on any warning messages and change them as you wish.
6) Share Submissions Page for a Form
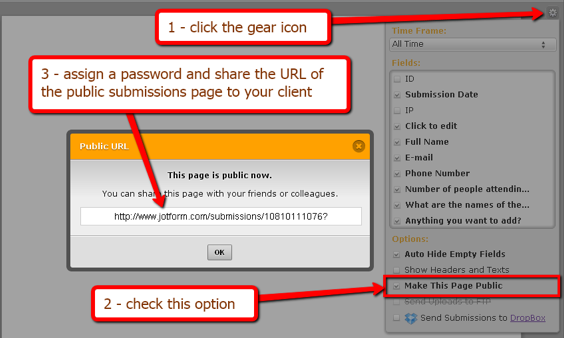
You can share a form’s responses with your colleagues or clients. To achieve this, go to your form’s submissions page. Then follow the steps in the screenshot below:
Once your client visits the public submissions page URL, they will have instant access to all information submitted by users. You can also password protect this page and give them the password.
7) Use reCaptcha Instead of the Default Captcha
reCAPTCHA is hard to beat. Because the images of words that optical character recognition (OCR) software has not been able to read.
“The subscribing websites (whose purposes are generally unrelated to the book digitization project) present these images for humans to decipher as CAPTCHA words, as part of their normal validation procedures. They then return the results to the reCAPTCHA service, which sends the results to the digitization projects. It means that you are helping digitize text books while protecting websites from bots attempting to access restricted areas.”
Cited from https://en.wikipedia.org/wiki/ReCAPTCHA
Go ahead and contribute to the digitization process!
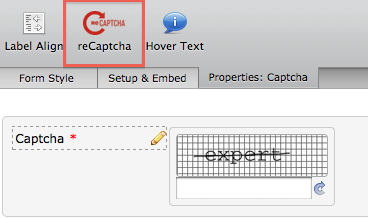
1. Select Captcha from Power Tools.
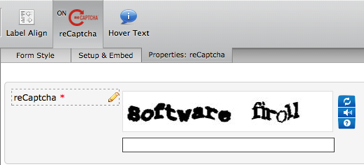
2. Click on reCaptcha from the toolbar at the top.
It will instantly change to reCaptcha:
Save your form and help them digitize some more books.
We hope that you found something useful in this list. If you have any favorite hidden feature on Jotform please share it with others in the comments below!








Send Comment:
17 Comments:
More than a year ago
please add customize you drop down menu it,s not a beautiful and radio buttons are not beatiful,if we want to add radio button using your widgets then logic conditions are not working
More than a year ago
There is something wrong at https://www.jotform.com/answers/54222-I-am-wondering-when-do-you-have-built-in-support-for-google-analytics-g, which is the View Answer link to indexbear's comment of 18 Jan 2012. It seems to redirect to https://www.jotform.com/answers/54222, and just keeps trying to redraw the page. I've tried it using 3 browsers. Feel free to remove this comment when the link or target page is fixed.
More than a year ago
Jotforms is pretty amazing. Great job!
More than a year ago
WOW thats awesome.... Love the features, what I wanted to know also, if in Jotforms there is the ability to have 3 fields where 2 have numbers and the 3rd field is an autosum of the first 2. For example if field 1 has 10 and the second field in another text box has 20 the third box will automatically show 30... Would love to have that feature !!! Thanks so much
JAMCS
More than a year ago
I am wondering when do you have built in support for google analytics goal and eCommerce tracking features?
More than a year ago
it's great...
More than a year ago
Love the tips -- I want more! So great!
Questions:
How can I redirect a follow=-up form to automatically send to a client based on the answer to a questions?
Example:
Question: Are you interested in "A" or "B"?
Based on the answer, I would like to send a unique sign-up form automatically.
Example:
Values assessment with clients requires "halving" a master list over and over to hone in to the top 10 personal values. I would like to have a new list populate with only the value words selected by the client and send out automatically.
I can't wait to hear how to do this!
Thanks a million!
More than a year ago
hello
please help...
can i use jotform to create airline booking forms with calender? if i can, please point me in the right direction. thanks!
More than a year ago
I can't get #6 (make submissions page public) to work. I visit the 'public' URL in a different browser than where my Jotform account is active, enter the password as I set it up, and all it shows is a blank 'submissions' looking page, with no submissions present - though there are over 400 new ones for the specific form I made 'public'. Help? Thanks!
More than a year ago
Siete mitici! Se passate a Firenze vi offro una pizza!
More than a year ago
Excellent!!!! Thanks I will definitely make use of these :)
Thanks
More than a year ago
Wow! Great.! But does anyone know how to make a website looks real like facebook or hotmail or even yahoo?
More than a year ago
Really Amazing, Love it
More than a year ago
I love it already, I'm thinking of a thousand ways to use Jot Forms... ;-)
More than a year ago
changing the header colour doesn't seem to work with the template codes on your example
More than a year ago
Great Tips Aytekin. Thanks.
More than a year ago
wow!!!