Once you successfully configure your SAML SSO application and define the appropriate attributes and claims, you can enable and customize the SSO Prefill functionality on your Enterprise server. This allows for seamless user authentication, improved security, and efficient attribute mapping, ensuring a streamlined login experience across your organization.
Setting up the SSO Prefill
Setting up the SSO Prefill is a straightforward process. Let’s do it!
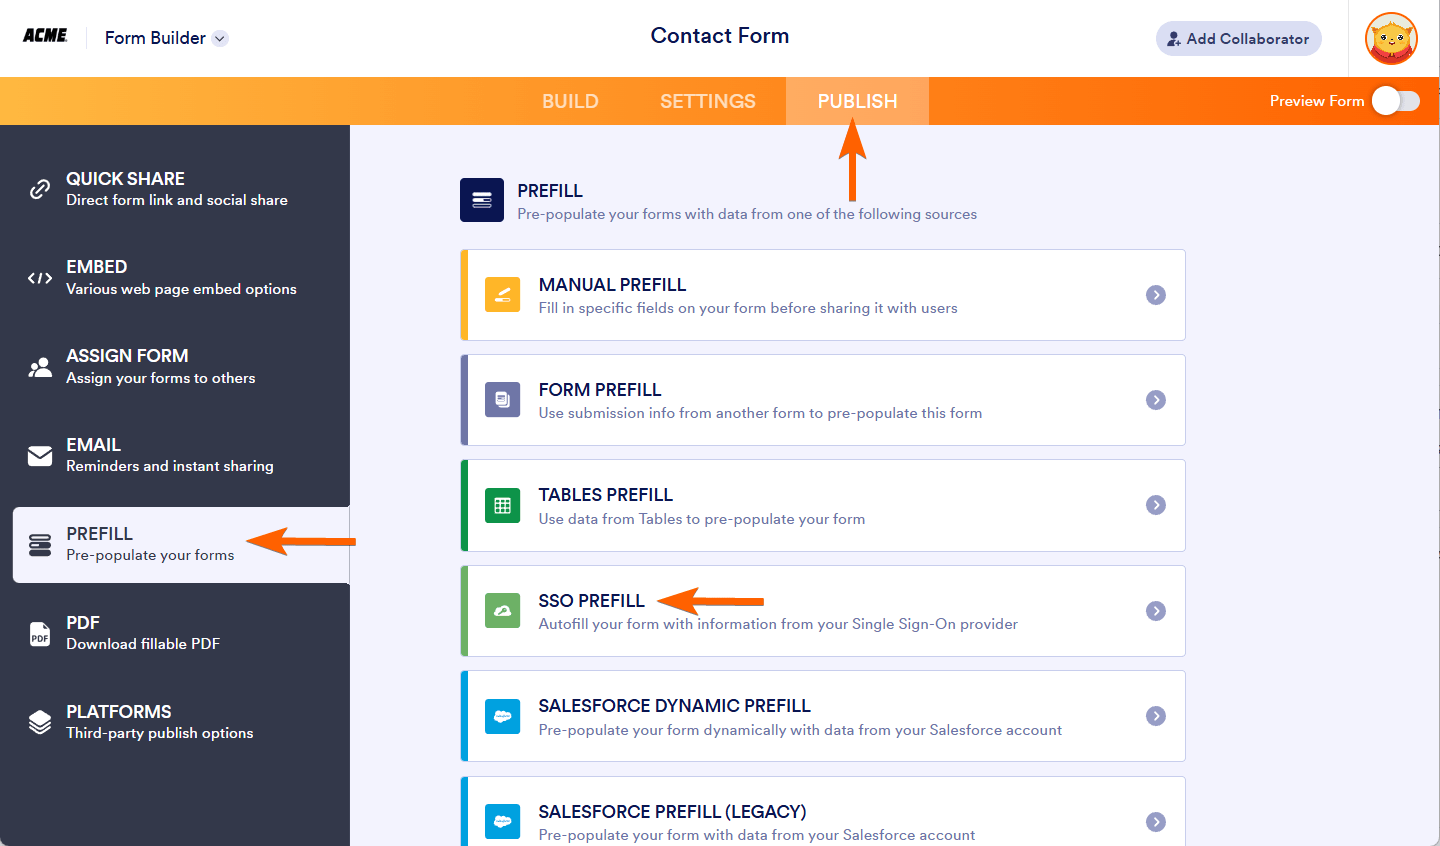
- In the Enterprise Form Builder, go to the Publish tab.
- Select Prefill on the left panel.
- Choose SSO Prefill from the list.
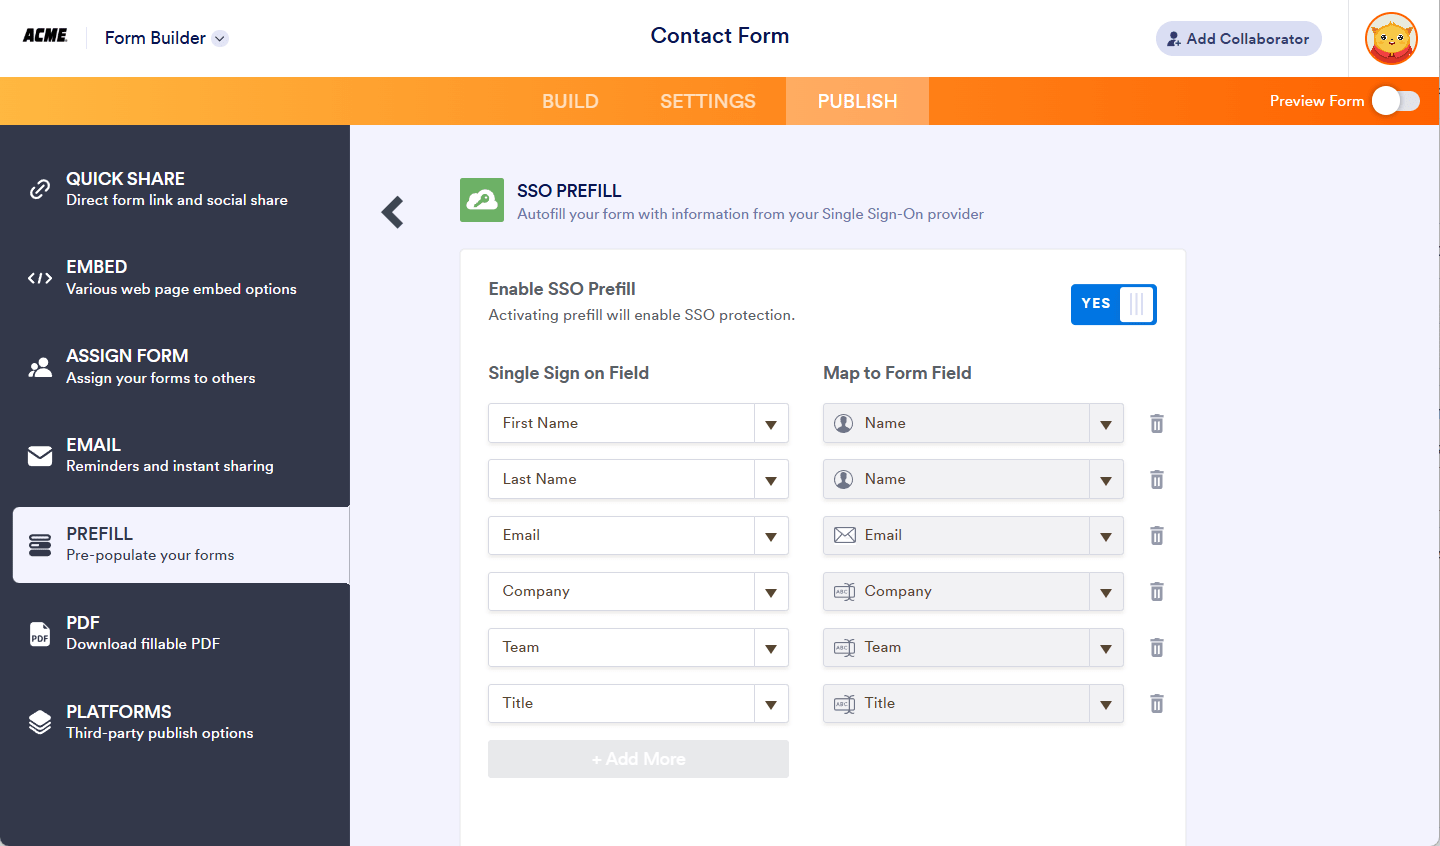
- Toggle the Enable SSO Prefill to Yes.
- Choose which attributes to prefill and map to your form fields when someone opens your form. The attributes will be automatically pulled from the user’s profile stored on your SSO server.
Configuring SAML Attributes With SSO Application
To use the SSO Prefill feature with your Jotform Enterprise forms, you must configure sending attributes within your SSO app. You can check for platform-specific instructions from the list below:
Okta SSO Prefill
With Okta SSO, you must set up the Attribute Statements, which are part of your application settings. Here’s how you can do it:
- Log in to your Okta admin account and go to the Admin page.
- Go to Applications and select your Jotform SAML app.
- Go to General at the top, then edit your SAML settings.
- Select Next to go to Configure SAML.
- Enter the following under Attribute Statements (optional):
Name | Value |
---|---|
First Name | user.firstName |
Last Name | user.lastName |
user.email | |
Phone Number | user.primaryPhone |
- Select Next > Finish at the bottom to save the settings.
Note
- You can add more attributes with Okta. You only need to define them through the Attribute Statements with their corresponding Profile Attributes, such as the above. You can view the available Profile Attributes through the Directory > Profile Editor in Okta.
- You must also fill these attributes to the respective profiles you added in Okta. If you don’t provide the user details, they will remain blank in your SSO-enabled form.
Google SSO Prefill
With Google Workspace SSO, you must set up the SAML Attribute Mapping, which is part of your SSO application. Here’s how you can do that:
1. Go to the G-Suite Admin page and navigate to the Apps:
2. Go to SAML Apps:
3. Select your current SAML configuration under Services:
4. Select “Configure SAML attribute mapping”:
5. Set the following values by clicking “ADD MAPPING” button:
Google Directory attributes: First name
App attributes: First Name
Google Directory attributes: Last name
App attributes: Last Name
Google Directory attributes: Primary email
App attributes: Email
Google Directory attributes: Phone number
App attributes: Phone Number
6. Save the configuration and proceed to Enabling SSO Prefill for your Jotform Enterprise forms.
Microsoft Entra ID SSO Prefill
The required steps for setting up SSO Prefill for an already configured Azure SSO Application.
What would you need?
- Azure Portal Admin Account with a working SAML Application with Jotform Enterprise
- Global Administrator, Cloud Application Administrator, Application Administrator, or owner of the app permissions for the Azure Portal Account
Steps:
1. Go to Azure Portal Home page and navigate to Enterprise applications -> All applications and select your Jotform SSO application:
2. Select Single sign-on from the menu on the left side:
3. Proceed to the Edit button in the “User Attributes & Claims” section:
4. Create or update claims pairs for Claim name and Value as shown below:
Claim name: First Name
Value: user.givenname
Claim name: Last Name
Value: user.surname
Claim name: Email
Value: user.mail
Claim name: Phone Number
Value: user.telephonenumber
5. Save and proceed to Enabling SSO Prefill for your Jotform Enterprise forms.
AD FS for SSO Prefill
In order to set up SSO Prefill for an already configured AD FS Relying Party Trust, please follow the steps below.
What would you need?
- AD FS Server with working SAML 2.0 SAML Application for Jotform Enterprise
- Management Permissions for AD FS
Steps:
1. Open AD FS Management Console and go to “Relying Party Trusts” on the left.
2. Right click on the application you wish to edit and select “Edit Claim Issuance Policy”:
3. Click “Add Rule…” button and select the “Send LDAP Attributes as Claims”:
4. Click “Next” button and enter a “Claim Rule Name”:
5. Select “Active Directory” for the Attribute Store dropdown and set the mapping table as follows.
Please select the LDAP Attribute from the dropdown list and type in manually the Outgoing Claim Type names:
Attribute: Given-Name
Outgoing Claim Type: First Name
Attribute: Surname
Outgoing Claim Type: Last Name
Attribute: E-Mail-Addresses
Outgoing Claim Type: Email
Attribute: Telephone-Number
Outgoing Claim Type: Phone Number
6. Click Finish to finish editing Claim Rule > Apply to save the changes on Claim Issuance Policy and OK to close Claim Issuance Policy.
7. Proceed to Enabling SSO Prefill for your Jotform Enterprise forms.
Send Comment: