Jotform has a lot of mapping widgets available for your forms. We have a map widget that can display your business location, calculate the distance from the origin to the destination, or geo-stamp your form submission without users needing to input it.
Jotform’s mapping widgets work with the default API key we have. However, we highly recommend setting up your API key to avoid interruptions.
Having a separate key for the widget is recommended because once the default API key reaches its limit, there is no way for Jotform to notify you about it. If you own the key, Google will notify you if there’s an issue or your billing needs to be updated.
Here are the prerequisites before you can create the API Key:
- You must have a Google Cloud Project. For more information on creating one, visit Creating and managing projects.
- You must create a Google Cloud Billing Account. For more details, visit Create a new Cloud Billing account.
- You must link the Billing Account to your Project. For more information, visit: How to enable billing on an existing project.
If you’ve already set up the above, let’s go with creating and setting up the API Key.
Creating an API Key
To create the API Key:
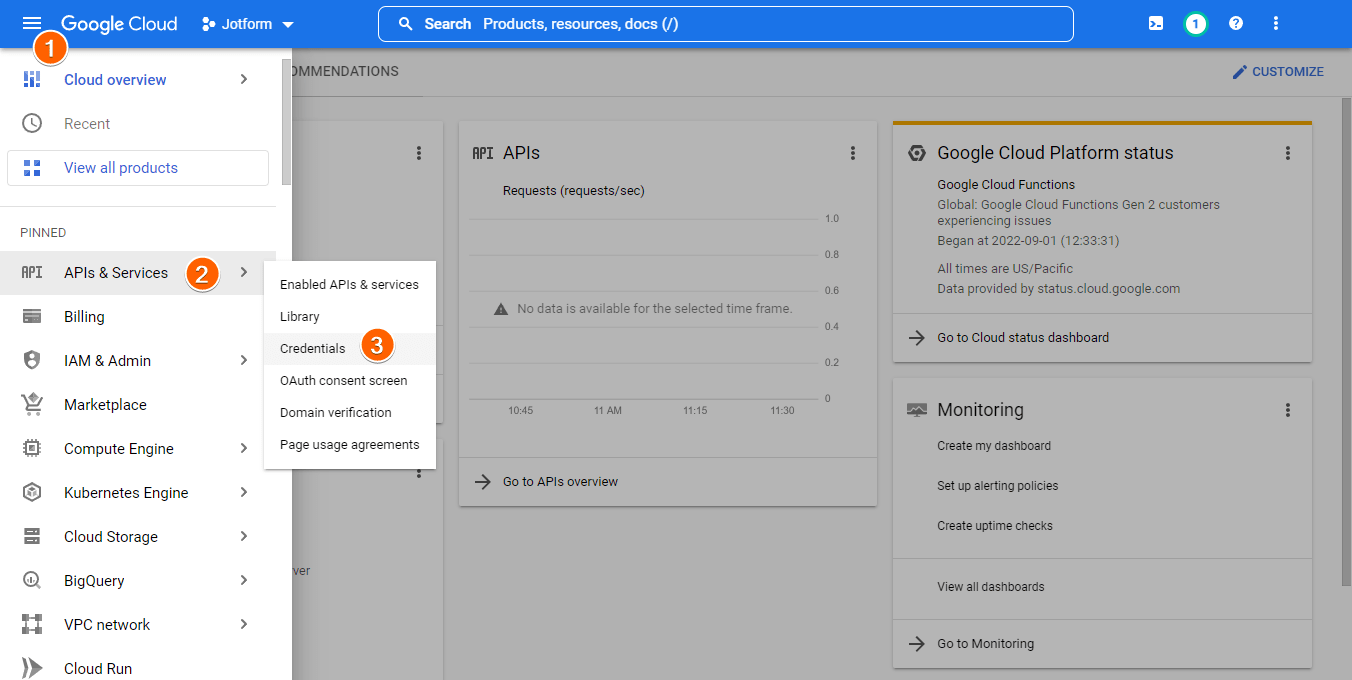
- Click the Navigation Menu (hamburger icon) at the top-left of the Google Cloud dashboard.
- Under the pinned items, click APIs & Services.
- Click Credentials from the list of options.
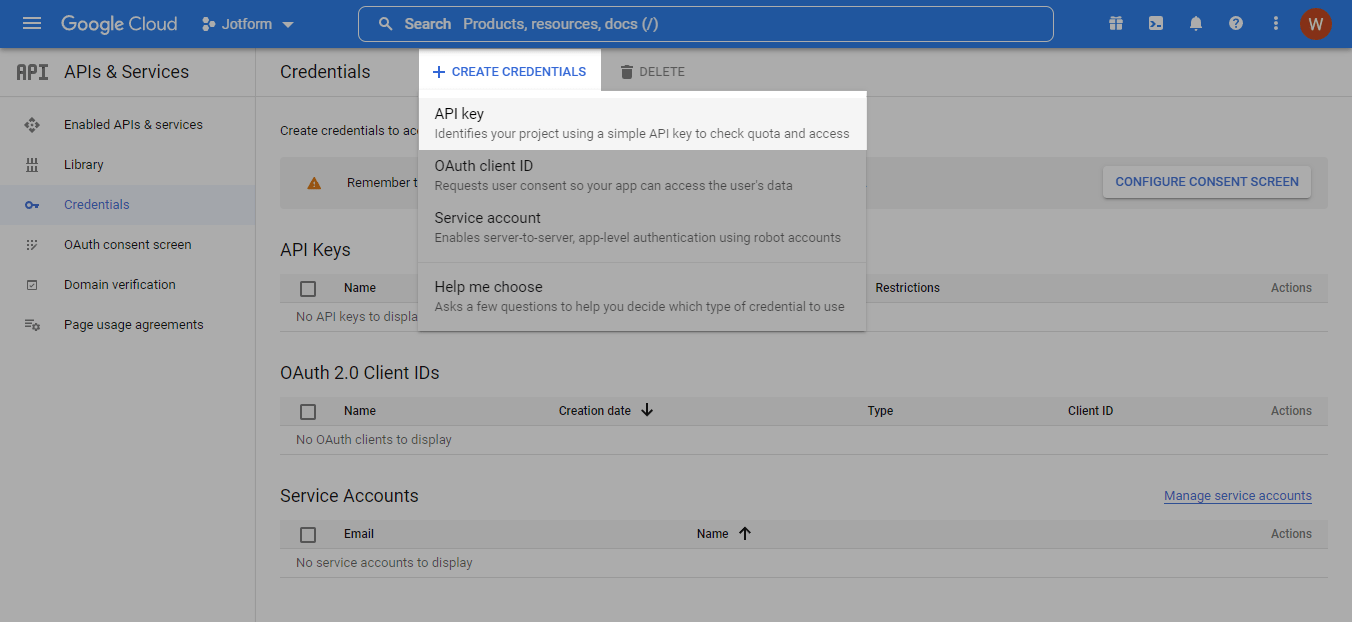
- At the top, click the + Create Credentials button.
- Choose the API key from the options. You will have the API Key created at this stage.
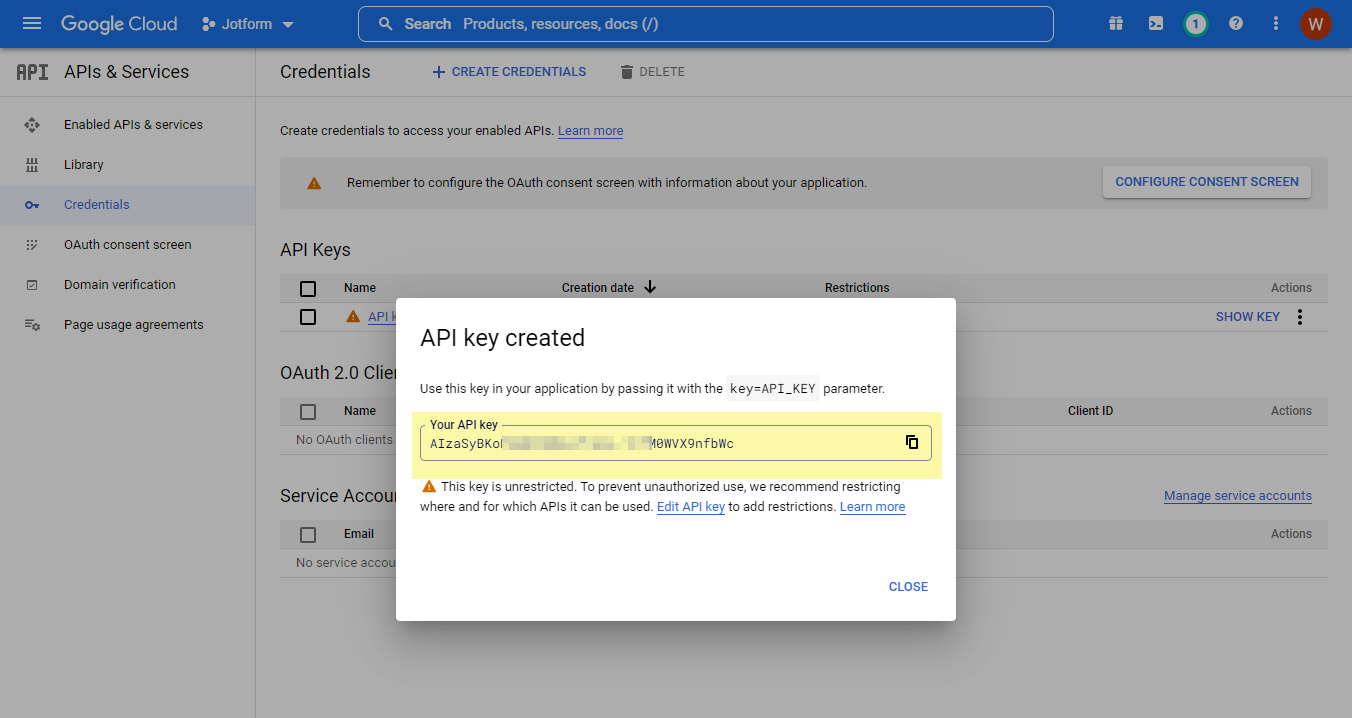
- Copy the API Key as highlighted in the below image.
You must set restrictions if you don’t want to expose your API key outside the Jotform domains.
Setting up API Key Restrictions
To set up the restrictions:
- Click the Edit API key link at the popup shown in the last image above or go back to the main Credentials screen, and click the API key you have just created.
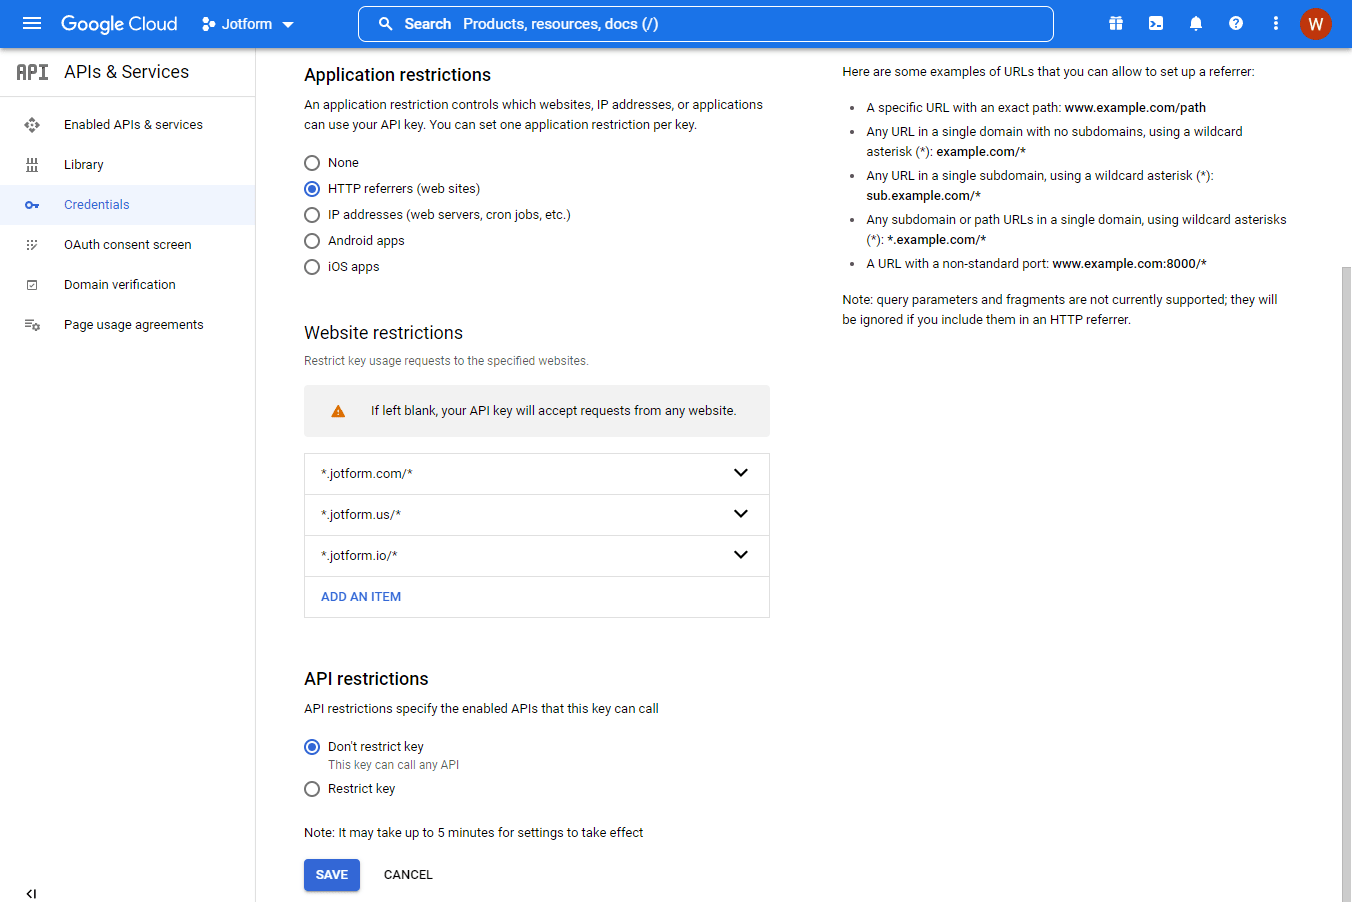
- Under Application restrictions, choose HTTP referrers (web sites).
- Under Website restrictions, add the domain based on your region from the below list, including the domain for widgets:
/*--- Jotform Domains --- */
*.jotform.com/* (Jotform main domain)
*.jotformpro.com/* (Old Premium/Pro account)
*.jotform.ca/* (Canada)
*.jotform.me/* (Asia)
*.myjotform.com/* (Africa)
*.jotformz.com/* (South America)
*.jotform.co/* (Others)
*.jotform.us/* (USA)
*.jotformeu.com/* (EU)
/*---Jotform Widgets ---*/
*.jotform.io/*- Click the Save button, and that’s it!
Notes:
- It isn’t necessary to add all Jotform domains. If you’re from the US, we recommend both jotform.com and jotform.us.
- If you are from the EU region or HIPAA account, you do not need to specify the EU and HIPAA domain as it is already part of the jotform.com item in the restriction list.
Enabling API for Maps
We recommend enabling all Maps API. Here’s how you can do that:
- Go to https://console.cloud.google.com/apis/library?filter=category:maps. This link filters the category from API Library to Maps.
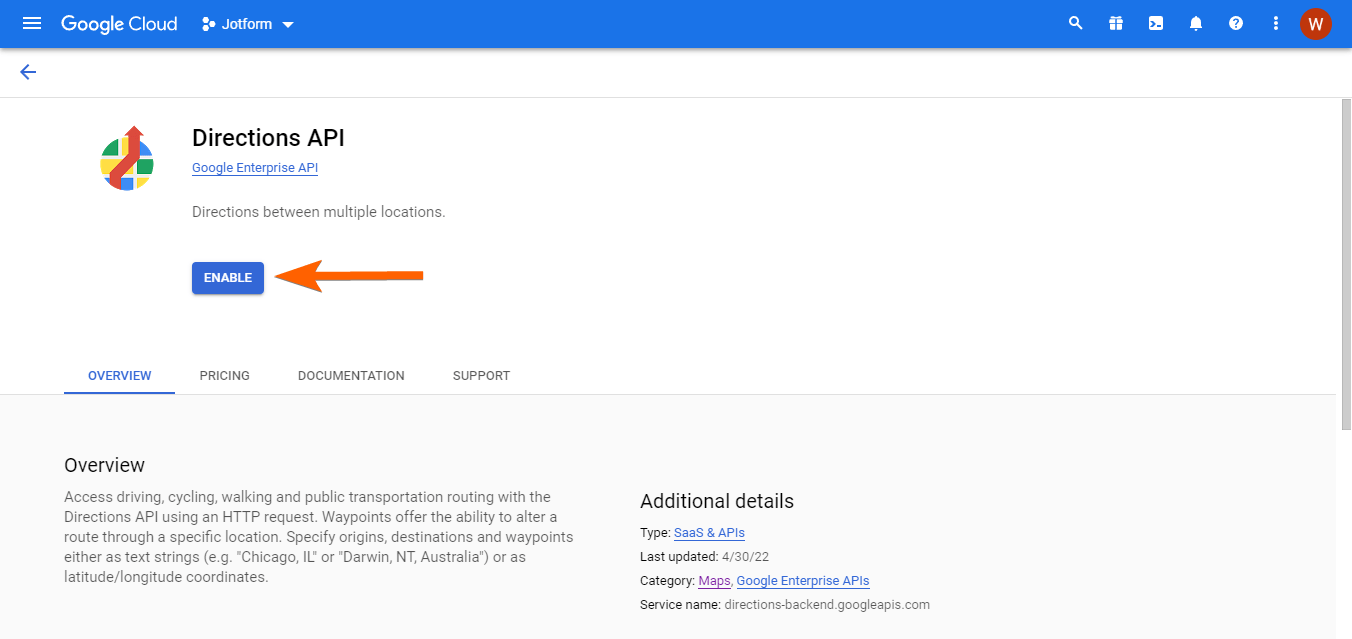
- Click one of the Maps API.
- Click the Enable button.
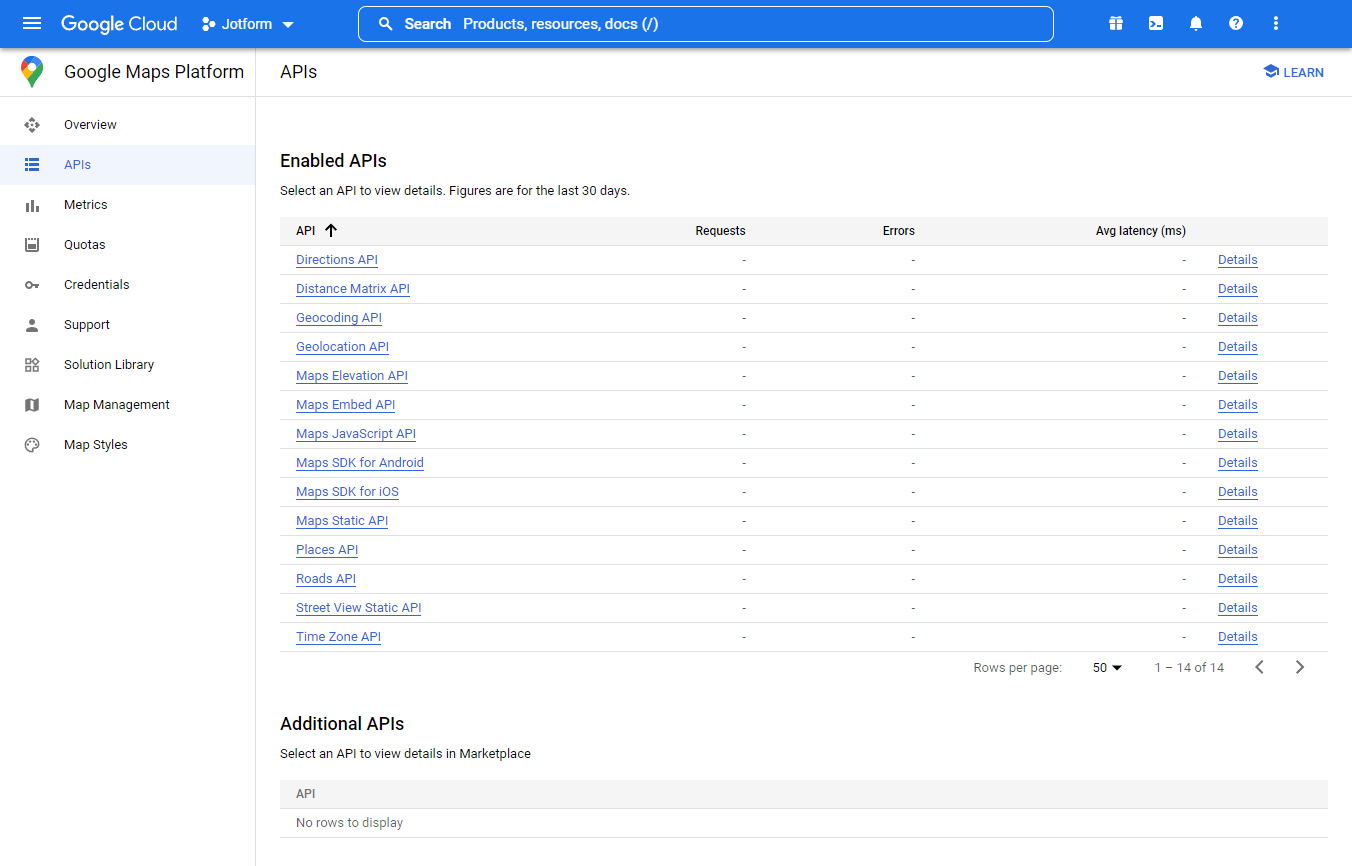
When enabled, the page will redirect you to the list of APIs under your Google Cloud account. Go back to API Library at step #1 and enable the other Maps API. You should see all enabled APIs under Google Maps Platform.

Send Comment:
5 Comments:
15 days ago
Is this the right link for a jotform developer to assist me in setting up a Google api?
Here is the link that shows what things I would need for the API: https://www.jotform.com/help/597-how-to-get-google-maps-api-key-for-jotform-mapping-widgets/#:~:text=Here%20are%20the,existing%20project.
I can assist with Jotform Apps!
19 days ago
Comment ajouter l'API au WIDGET ? Une fois que nous avons la clé API
95 days ago
How to add the API to the WIDGET ? once we have the API key, where does it go ? there are no instructions for that, an I cant find anywhere for it to go
118 days ago
This is the best set of instructions on how to do this that I've seen thus far. My only suggestion is that some of the screenshots will need to be updated. Google as updated their platform and less tech-savvy people trying to follow this may get confused.
215 days ago
Por essa API eu consigo preencher dados de endereço automaticamente após inserir um código postal?